"No matter how terrified you may be, own your fear and take that leap anyway because whether you land on your feet or on your butt, the journey is well worth it."
-- Laurie Laliberte
"If your dreams do not scare you, they are not big enough."
-- Ellen Johnson Sirleaf
"Life shrinks or expands in proportion to one's courage."
-- Anais Nin

Sunday, September 29, 2013

This One's for Tony, as Promised

I keep promising my pal Tony I will either email or post this recipe, so here we goooo . . .

I was introduced to a similar recipe by a close friend nearly thirty years ago. This is my standard go-to rice recipe. It's great on a buffet because it goes with anything, so it makes the perfect background for multiple dishes. It also makes a terrific base for just about any meat and vegetable mix-ins. I use the leftovers to make fried rice and I've served it every which way you can imagine.

Enough gushing, get ready to get your rice on.

Go With Everything Brown Rice Pilaf

2 c brown rice
4 c stock (vegetable, beef, chicken, whichever type suits your meal)
1 large yellow onion, chopped
2 cloves garlic, minced
4 T butter, the real thing
1/2 to 1 c whole wheat pasta, see note below
1/4 t salt, optional

In a deep-walled saute pan, saute onions in butter until translucent, but not brown
Add garlic, rice, and pasta and heat just until they pick up a little color
Pour in stock, stir, bring to boil
Lower heat to a simmer and cover tightly
Allow to simmer, undisturbed, for about 35 minutes
Rice is cooked when all liquid is absorbed, about 35 to 45 minutes

This will yield about 6-7 cups of cooked rice pilaf.

A note about ingredients: If you don't have enough stock for the recipe, make up the rest with water, or you can cut the recipe in half since this actually makes about 6 cups of rice. You CAN use white rice and white pasta if you prefer, but you have to shorten your cook time. Take a look at the package directions for the rice and use those times as a guide.

A note about the pasta: If you're using a shaped pasta like a rotini or farfalle, you'll want a full cup. If you use a small, grain-shaped pasta like orzo, cut amount to a half cup. Don't use a long noodle like spaghetti or linguine. If you can't have wheat, just leave it out completely since the cook time on wheat-free varieties varies so widely.

Happy Cooking!

Sunday, September 22, 2013

Not Another Pulled Pork Recipe!

I was at a loss. Pork loin was on sale. Crazy cheap. But you had to buy the family size. Limit two. Did I mention it was crazy cheap? So I bought two of the family size. I had plenty of room in the freezer. And we eat a LOT of pork around here. But buying a lot of pork for crazy cheap in Oklahoma means you end up with about 47 pounds of pork in your freezer. No lie.

I figure it'll last me all winter.

Anyhow, now I had to figure out something to do with all this pork. I wanted to make just a basic pulled pork in the crock pot with the barbecue sauce and a few onions, but I had no sauce and my roommate was kind enough to make sure to devour all the onions along with virtually every other morsel of food in the house.

So I hit the kitchen and took stock. No, not chicken stock. The roommate got that too.

Sigh.

So that's how this recipe was born. It was a Hail Mary and it just happened to work.

**********
You're Better off Living Alone Pulled Pork

5 lbs pork loin, bone-in or partially boneless, still frozen
2-3 tsp garlic powder
1 quart water

Put all ingredients except for the meat into the slow cooker and give it a stir. It doesn't have to be completely blended, you just don't want any of it dry when you add your roast.
Add meat, cover, and cook on low for about 14-16 hours. Around the 10 hour mark, turn the roast over and put the cover back on.

*If you don't want to make the copycat, you'll need 2-3 packets of the store-bought onion soup mix.

**********
I kid you not. That's really all there is to it. The secret is low and slow. I am convinced that's why meat that I cook in the crock pot always comes out more tender and flavorful when I begin with it still frozen. It takes longer to cook sometimes, but it's so tender it almost melts in your mouth.

The broth is amazing, more like soup. I've mentioned before I'm not a gravy person, so I think rice pilaf would be a great side for this. However, we served it with baked sweet potatoes, cornbread, and summer squash smothered in onions.

I promised my pal Tony that I would post the rice pilaf recipe too, but I don't have the time right now, so I'll make a note and you can all have it next Sunday instead.

Don't look so sad. Tell you what: as a consolation prize, I'll tell you my plans for the leftover broth, since that's all that was left over.

Again, just dump the broth into the crock pot. If you don't have enough, make up some of the liquid with some canned beef or vegetable broth, or even water. Add your meat. Same deal -- about a 5 pound pork loin, either partially boneless or bone-in, still frozen. (You could even get away with frozen broth.)

Cook it on low for about 8 hours. Turn the meat over, add about 2-3 pounds of mixed frozen vegetables. (Whatever kind you want. I think I'm going to use spinach and whatever bags of veggies are sitting in the freezer half used.) Also, stir in about 2 cups of rice and let it go. Check on it after about 4 hours to see whether the rice is done and/or you need to add more liquid.

Happy Crock Potting!


Sunday, September 15, 2013

How to Get a Free Hat Pattern, Volume 2

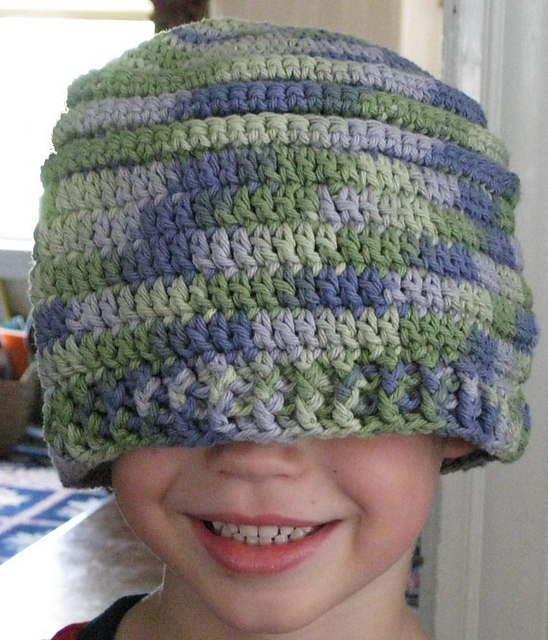
My younger nephew at age five
modeling the Astro Hat
I am very pleased to say that in the year since the original post, I've had quite a few requests for
patterns from my readers. It warms my cold, dead, tired heart. Heh.

So please, please, PLEASE, keep up the good works, and keep requesting those freebies. I will gladly continue to send out those free pdfs to any of you who request them. Now, for those of you who have no idea what in the world I'm talking about, keep reading . . .

Since my income doesn't allow for a whole lot of charitable contributions, and because I find most charities to be shams, I choose to contribute what I CAN give: crochet. Cancer patients, among others, can always benefit from hats/chemo caps, so I make all of my hat patterns available free to those of you who pledge to make at least two of the pattern as donations to the charities of your choice.

Before I get too far ahead of myself, let me first give you an updated list of, and links to, all of my hat patterns:

  1. Big Girl Hat #1*
  2. The Blog Collection Beanie*
  3. Simple Earth Hat
  4. Astro Hat

Okay, now a list of organizations I like to support or that have been suggested by my readers:
  • Dana Farber Cancer Institute because several friends of mine (survivors and those not so fortunate), who have had cancer, have spent quite a bit of time there
  • Boston Children's Hospital because one of my closest friends, who died of Cystic Fibrosis, called this his second home
  • Teal Hat Project (yes, your donation to them should be teal, their signature color) begun by an online pal a couple of years back, gathers hats to donate to ovarian cancer patients
  • Halos of Hope recommended by Jessica, one of my blog readers, last year

Now for more details and the official rules:
  • Place your request and your email address in the comments below this post and I will send your pattern via email within about 72 hours. (The best way to post your email is like this: biggirljewelry at yahoo dot com.) Some of the patterns will come from my biggirljewelry email, some from ravelry. It depends on where I have the file stored, so keep your eyes peeled.
  • For each hat pattern you request, you pledge to make two hats to give to the charity of your choice. You don't have to choose from my list; you may give them to whomever you want, like your local church or homeless shelter.
  • Just for clarification, if you request all four patterns, you pledge to make eight hats for charity. After you've fulfilled your obligation, go right ahead and make as many as you wish for family and friends or even to sell on Etsy or local craft fairs.
  • More clarification . . . this applies to my hat patterns only. Requests for other patterns will not be filled. The original purpose of this program was to encourage my readers to make chemo caps. I began it in memory of a friend of mine who lost her fight with leukemia last year.
  • I would love to see pictures of your finished projects. Please don't be shy about emailing them to me.
My older nephew, then age eight,
modeled the Simple Earth Hat

I plan to continue this program for as long as I have this blog. If I add any hat patterns to my collection, regardless of whether I have posted them in the list, I will include it.

*In the interest of full disclosure, know that each of these two patterns is also available here on the blog at no charge, but I don't sell the pdf versions. If you request it, I will send the pdf to you via email, but the same rules apply to these as my paid patterns.
My niece reluctantly modeled The Blog Collection Beanie for me when she was three

Happy Crocheting!

To reiterate: You are pledging to make two hats for each pattern you request. Four hats are available as of 1/8/2013. If you request all four patterns, I would expect that you would make and donate eight hats, two of each pattern. Also, I specifically request that you do NOT email your requests to me. Leave a comment below in the comments section. Emailed requests are not likely to be answered as this is not my main email account.

Sunday, September 8, 2013

Allergy Friendly and Tastes Good!

It seems the older I get, the more allergies and sensitivities, especially food sensitivities, present themselves. This is why I lean toward whole grains (if any at all), fresh, unprocessed meats, and real vegetables . . . lots of vegetables.

A while back, I posted the recipe for my take on my mother's glazed carrots. Well, this one has no processed sugar. It's also dairy free because I cut out the butter, and . . . it was sort of an accident.

I'm willing to bet there are other versions of the same recipe out there, but I came up with this combination all on my own while throwing an easy dinner into the oven a few weeks ago. I also made it again last night. Unfortunately, I like it so much, it didn't sit on a plate long enough for pictures, so you'll just have to take my word that it looks as good as it tastes.

Because I take short cuts where I can get away with it, I began with a bag of frozen carrots. If you prefer fresh, cut and blanch them before you begin. Just please, don't use canned.


Honey Garlic Roasted Carrots

1lb bag frozen carrots OR 1lb fresh carrots cut into rounds and blanched
1/4c oil (I prefer canola)
1/4c honey
salt
pepper
garlic powder (or 2 cloves fresh garlic, chopped)

Preheat oven to 400 degrees farenheit
Line cookie sheet or baking pan with aluminum foil
Pour oil onto sheet to coat bottom
Lay still-frozen carrots on pan in a single layer and toss lightly (They don't need to be coated, just pick up a bit of oil so they don't stick.)
Sprinkle with salt, pepper, and garlic powder to taste
Cook at 400f for about 20 minutes
Remove from oven and toss again so they don't stick
Return to oven to finish cooking, about 10 minutes or just until they begin to caramelize around the edges
Remove from oven and immediately drizzle with honey
Let stand about 2 to 3 minutes on baking pan
Serve hot

This is my new favorite recipe for carrots.

Happy Cooking!

Sunday, September 1, 2013

Free Pattern Blog Collection Tablet Sleeve Tutorial

Hey ya'll! I promised you a new free pattern this week and it's here. Unfortunately, I have yet to take really good pictures, so bear with me. The one I have on file will do for now. Anyhow, you're all more interested in the pattern than looking at pretty pictures, right? So let's get to it!

The Blog Collection

Sleeve for 10" Tablet

Note: The sleeve in the picture is for my Nexus 10 and began with a chain count of 25. Yarn used was Lily Sugar and Cream, 100% cotton 1 ball Hot Green and 2 balls Hot Orange.
This project is crocheted in continuous rounds. I don't join and ch1 at the end of each round, but you may if you choose. This method, like Amigurumi, can cause your first stitch to travel or twist. Notes are added throughout the pattern to tell you where to adjust for that twist.

Supplies:

worsted weight yarn of your choice (approx. 150 yds of main color and 70 yds of accent color)
size H-8 (5mm) crochet hook
stitch marker
yarn needle or smaller hook for weaving in ends
1" button

Work a beginning chain long enough to fit the width of your tablet. If you plan to line your finished project, add 4 or 5 more depending on how tightly you crochet. If you do not plan to line it, add 2 or 3 more to ensure you have enough wiggle room for inserting and removing your tablet.

Round 1: 3sc in 2nd ch from hook, sc in each chain across except for the last, 5sc in last ch turning toward back, sc in remaining loops of each ch across except for the last (the one with 3sc already), 2sc in last ch

Round 2: sc in each st around

Round 3-19: repeat Round 2

Round 20: repeat Round 2, change colors

Note: Before you change colors, check that your last stitch is on the end of your project. If not, work a few more sc so your color change will be on the edge, so it's less obvious. This is also a good spot to fit your sleeve to your tablet and ensure you have enough play to slide the tablet in and out of the sleeve.

Round 21: sc in each st around

Round 22: repeat Round 21

Round 23: sc in back loop only of each st around

Round 24: repeat Round 23

Round 25: [sc in back loop only of next stitch, dc in back loop only of next stitch] around

Round 26: [dc in back loop only of next stitch, sc in back loop only of next stitch] around

Note: Yes, because you have an even number of stitches, you will have two of the same stitch next to each other as you transition between rounds here. I've found that this section works pretty straight, so you really shouldn't see this in your finished project.

Round 27: repeat Round 25

Round 28: repeat Round 26

Round 29: repeat Round 25

Round 30: sc in back loop only of each st around

Rounds 31-32: repeat Round 30

Round 33: sc in each st around, change colors

Note: Before you change colors, check that your last stitch is on the end of your project. If not, work a few more sc so your color change will be on the edge, so it's less obvious.

Round 34: sc in each st around

Rounds 35-end: repeat Round 34 until your sleeve is long enough to cover your tablet and have two extra rows for complete coverage

Final Round/Finishing: Find the middle front of your project and mark it for attaching your button. Find the corresponding stitch on the back of the project and mark it for the button loop.

sc in each st stopping at marked st on back of project, ch12, attach in same st w/sl st, sl st in each ch around loop, sc in next st and each st around

Note: Before you finish off, check for the twist in your project. If necessary, continue to work sc around until you reach the edge. Join with a sl st in next st and finish off.

**********

This pattern/tutorial is offered at no cost, but will be available to purchase as a part of my next crochet book. It has yet to be fully tested, so I welcome all comments and questions. Please do not email them to me; instead leave them in the comments section below so that others may benefit from the answers.

As always, you are welcome to make as many as you wish to sell in your Etsy shops or at craft sales, etc. I ask only that you give me credit for the design and do not re-post or print and sell the original pattern. Instead, link to the pattern when referring to it.

Happy Crocheting!