

Welcome! Make yourself a chai latte, sit back, and relax for a while.
Friday, December 24, 2010
Have Yourself a Merry Little Christmas
This is not my favorite Christmas song. I don't think I really have one, actually. However this arrangement combined with the song and its sentiment IS my favorite. So to heck with political correctness! Merry Christmas to one and all.

Monday, December 13, 2010
It's All Japanese to Me. . .Part Two!
 |
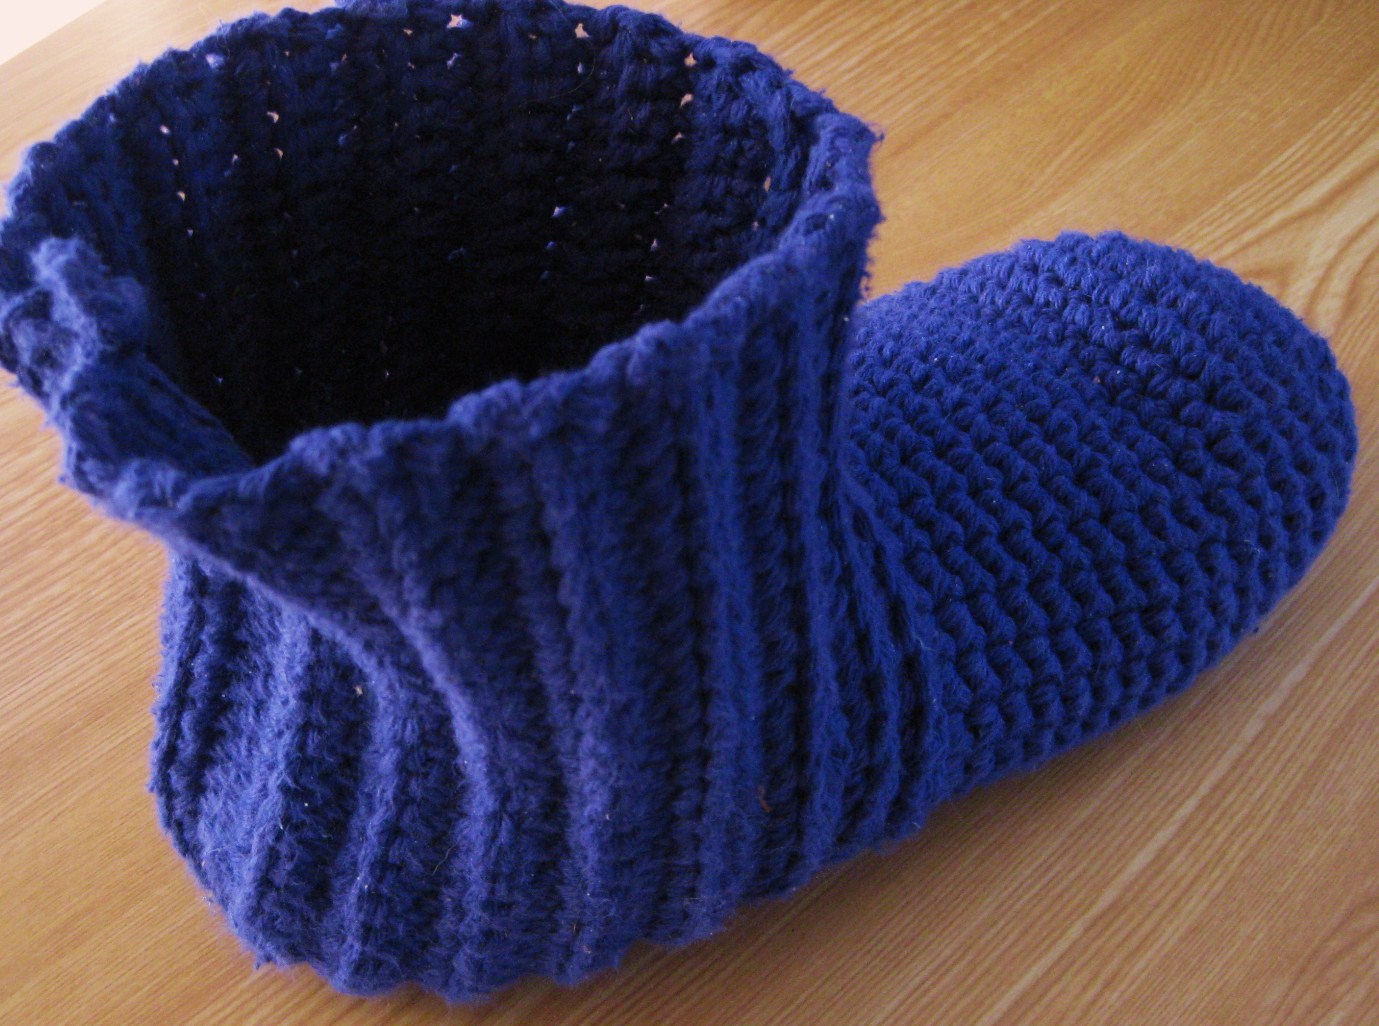
| slipper sock by sharon klinsky adjusted to fit my two year old niece |
 |
| simple earth hat by laurie laliberte |
 |
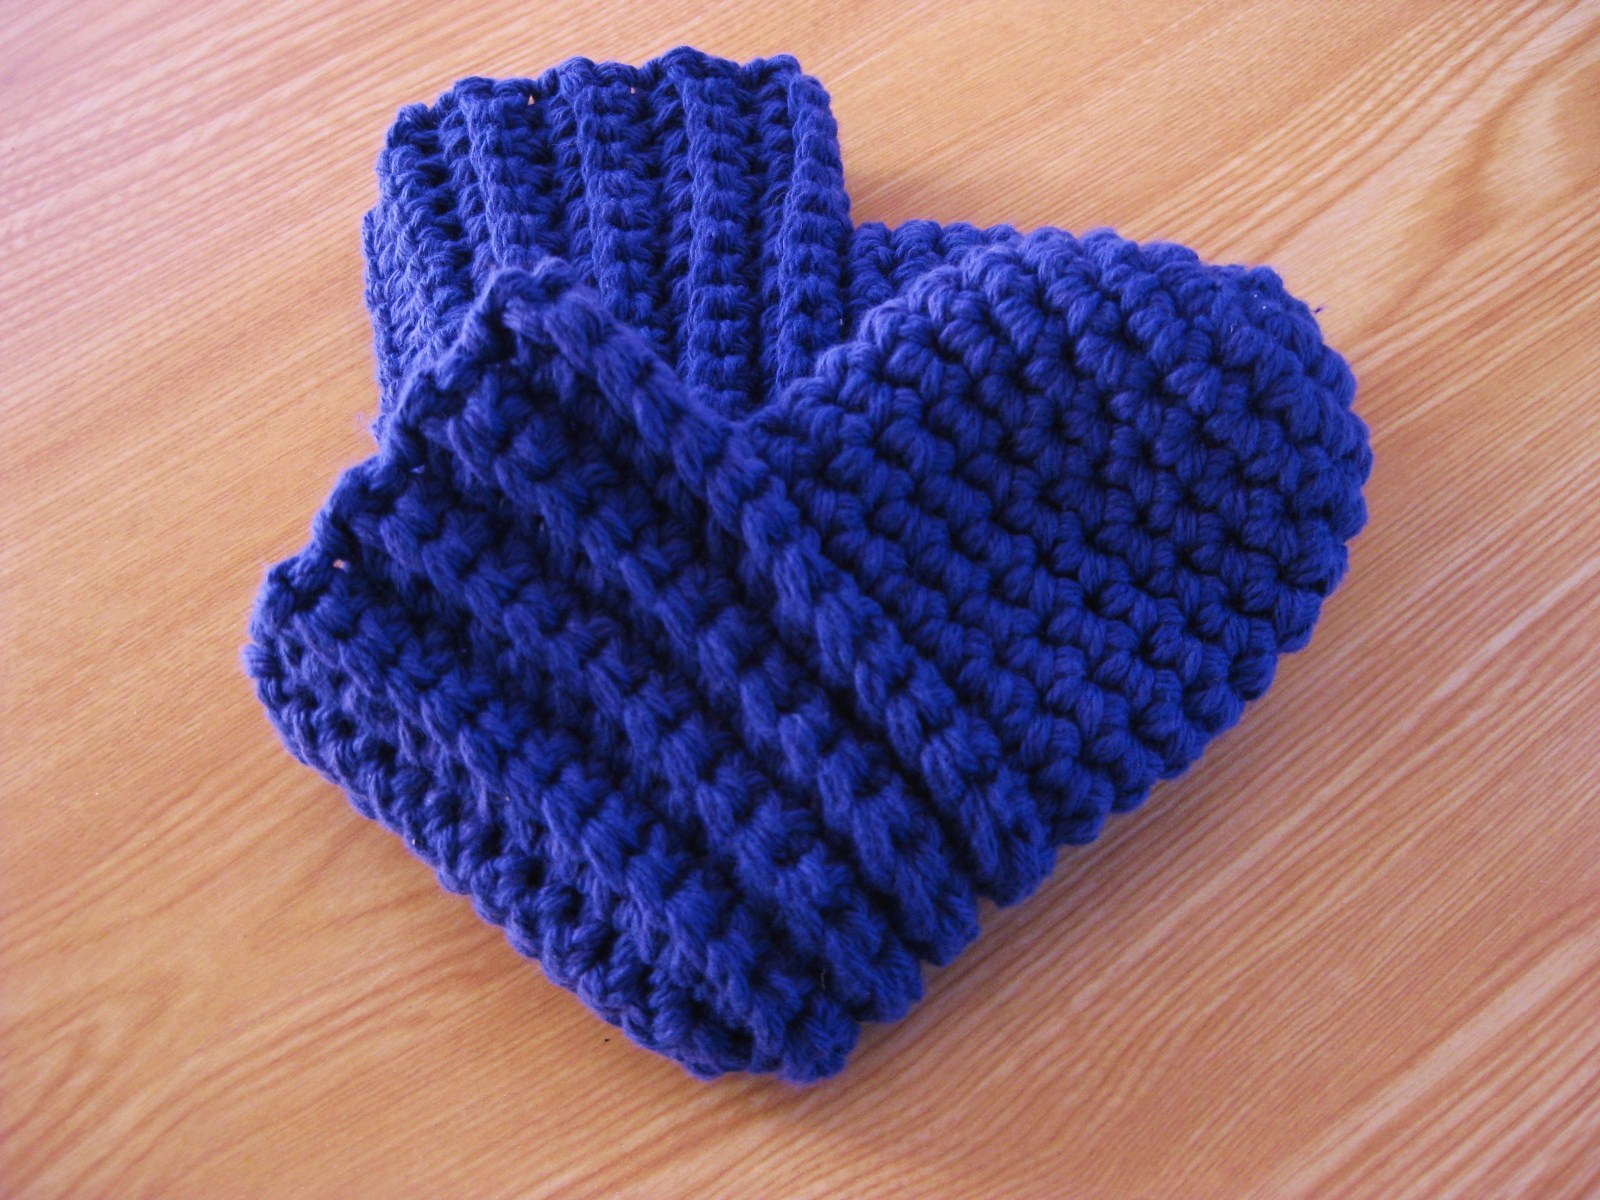
| slipper sock by sharon klinsky pattern adjusted to fit me |
Okay, done. . .finally time to just knuckle down and finish those slipper socks I started for myself back in October. This is one of the most versatile and easy to adjust patterns I've ever worked. I'll tell ya Sharon Klinsky, their designer, is a GENIUS! Adjusting the pattern to accommodate different sizes, widths, etc is so easy it's criminal. No, they're not glamorous, but they're extremely warm because they're worked with two strands of yarn and they work up quickly because of the simplicity of the design. In just a few hours I made a pair to give to my two year old niece for Christmas. I will warn you if you're prone to discomfort/pain in your hands for any reason, these can be tough to work. My fingers are still stiff a day after finishing the pair I made for the little one (partially from the crocheting, partially from the weather). Still, I'd like to make a few more pairs before Christmas, one for each of her brothers and another for myself so my feet won't be cold while I wash my first pair.
Somehow in this flurry of activity I WAS able to finish the cross stitching on the towel in my "Cross-Stitchable" collection. I'm sure I'll be listing that before this post hits your screen, at least that's my intent. I must say that I really like it and I'm darn proud of it because I've never written a cross stitch pattern before. (Can you tell I can't wait to show it off?) Anyhow, now that I've brought you full circle, perhaps I should get to the reason for these two posts. . .
 |
| plaits & bobbles hat by michele thompson |
After seeing N's hat, his Mom asked if I had, already made, a hat in my stash that would coordinate with her winter coat. Immediately I thought of one I made last winter that I absolutely love. I originally made the pattern for myself a couple of years ago in a solid lilac acrylic. I made it again in this aran fleck that just seemed to beg for this pattern when I picked it up at the craft store.
Note: I searched everywhere so I could link this pattern, but it's nowhere to be found.What better to go with a beige and chocolate brown coat, right? Wrong. Mom tried it on and wasn't crazy about the way it slouched on her. She asked for something more fitted. So I searched. . .and searched. . .and I found a few styles that I thought would suit her simple/less embellished style. We settled on chocolate brown for the color so I wouldn't have to order yarn before getting started and I pulled up my Ravelry queue to show her the styles I had chosen for her. She stood over my shoulder as I clicked from one style to the next and suddenly I heard, "Wait, stop! Click that one." "THIS one?" "Yeah, that one. Do you have that color? Not the blue, the green under it." She had spotted a pretty puff stitch beret/tam style I had queued for myself. Well, it just so happens that yes, I DID have that color in my stash AND the pattern from Pierrot Yarns was FREE! Within an hour, I was comfy on the couch with my laptop on the coffee table in front of me and the project begun.
In the interest of saving paper I rarely print patterns. Instead I save them on my laptop so I can carry them almost anywhere. However, I need to get around to creating a better filing system.
By the time dinner was ready I was tweaking the pattern slightly so it would better suit Mom's face shape vs. the Japanese model in the picture. By bedtime the hat was done and it looked great. . .and great on her. So why is this particular project blogworthy? Because the doggone thing's in Japanese! Honestly, I believe the two most beautiful sources on Ravelry for free patterns are the Japanese companies (which I lump under one umbrella) and Drops Design. Both have attention to detail that we Americans often overlook. Of course, the drawback to each of them is that neither is written in American terminology. That's why I hadn't made projects from either group until now.
 |
| oval tiny bubbles scrubby by laurie laliberte |
When I first sat down to make Mom's hat, I groaned. I had forgotten that it was a Japanese pattern. Okay, deep breath. The All Shawl pattern was written AND had a chart. Heck, I had WRITTEN a chart for my Oval Tiny Bubbles Scrubby so I could better visualize the end product. (I later wrote the instructions by following that chart.) I knew I could make the hat by working completely from the chart. I just had to find a key so I could be certain I was reading it correctly. I found a great conversion chart and set to work. By the time I began the third round, I was able to follow the pattern without a second thought and it was a breeze. All in all, I think the finished project turned out great AND it did wonders for my self confidence. I still can't read Japanese, but now I know I can work any of the Japanese patterns available on Ravelry. . .and so can you!
As always, Happy Crocheting!
All of the items pictured in this article were crocheted by Laurie Laliberte using Lily Sugar 'n Cream except the slipper socks which were done in Pisgah Peaches 'n Creme 100% cotton worsted weight yarn. All photos were taken by and are property of Laurie Laliberte.
Saturday, December 11, 2010
It's All Japanese to Me. . .Part One
 |
| waikiki scarf by marilyn losee |
 |
| graceful soft mesh beret by kathy north |
 |
| grandpa's sweater towel by laurie laliberte |
 |
| cross-stitchable towel by laurie laliberte |
 |
| all shawl by doris chan |
 |
| crocheted mesh scarf by heidi hirtle |
 |
| combination summer hat by amanda muscha |
 |
| puff striped slouch hat by ashley kaye |
* * *
 |
tunisian lace scarf by elisa purnell |
All of the items pictured in this article were crocheted by Laurie Laliberte using Pisgah Peaches 'n Creme 100% cotton worsted weight yarn. All except the cross-stitchable towel were laundered before they were photographed which adds some loft to the finished product. Some were blocked; some were tumble dried to add more loft. All photos were taken by and are property of Laurie Laliberte.
Thursday, November 25, 2010
Where's the New Stuff?
I was born and raised in Manchester, NH as was my dad. Mom's journey was a bit more involved, but she did most of her growing up there. The core of my mother's side of the family, my grandparents, pretty much stayed in Manchester, in the same neighborhood, for most of the time I remained in the city. Dad's side spread all over, so I didn't get the benefit of their company except at weddings, funerals, and holidays. No, my aim here is not to give you my complete life history, simply to segue into the reason that the following info may be terribly inaccurate.
Dad's sister (one of five) Irene lived with her husband and kids in Hampton, NH which was an hour drive from Manchester. We weren't close in proximity or spirit, but here's what I've been able to piece together based on what I do know: Auntie Irene was the quintessential craft lady. Rather than work a typical 9 to 5 job, she worked from home where she raised two daughters and made extra income by selling her wares at craft fairs and shows. Nearly every Christmas gift from my Aunt Irene was handmade, from the stocking knitted the year I was born, to the beautiful life-sized rag doll when I was about 3 or 4, to the giant stuffed peanut in honor of Jimmy Carter's election as president. My cousins and I looked forward to Auntie Irene's creations every year and they were truly treasured objects meant to be used, played with, and eventually lost to years of loving wear.
Dad's sister (one of five) Irene lived with her husband and kids in Hampton, NH which was an hour drive from Manchester. We weren't close in proximity or spirit, but here's what I've been able to piece together based on what I do know: Auntie Irene was the quintessential craft lady. Rather than work a typical 9 to 5 job, she worked from home where she raised two daughters and made extra income by selling her wares at craft fairs and shows. Nearly every Christmas gift from my Aunt Irene was handmade, from the stocking knitted the year I was born, to the beautiful life-sized rag doll when I was about 3 or 4, to the giant stuffed peanut in honor of Jimmy Carter's election as president. My cousins and I looked forward to Auntie Irene's creations every year and they were truly treasured objects meant to be used, played with, and eventually lost to years of loving wear.
The last gift I received before she and my uncle Romie retired to Florida was a cross stitch kit when I was 13. Although I had already developed a healthy respect for handcrafts, thanks to my mothers talent for crochet and my father's for ceramics, this 3x5" kit was a catalyst for what would become a long-running love affair with cross-stitch embroidery. Unfortunately, my eyes and hands are not what they once were and I am no longer able to produce items that require such detail, but I can contribute a few objects to entertain those of you who enjoy cross-stitching as much as I once did. When I was cross-stitching regularly I loved that I could use such a simple process to embellish mundane items like kitchen towels and pot holders.
So why am I telling you all of this? Truth be told, I'm hoping a somewhat interesting back story will be a sufficient substitution for new patterns, at least for now. About a month ago I was inspired by a towel I embellished nearly 20 years ago. It's become so sad looking and worn that I wondered if I could create a version of my own. Easier said than done. This has become a much bigger undertaking than I expected. As with any towel I design, I wanted to create a set that also included a pot holder and scrubby. MAKING these projects has been a heckuvalot easier than translating the instructions into language simple enough for a crochet newbie, but I'm almost there and I hoped to have the whole set available before Thanksgiving. (So much for THAT deadline.) Of all my designs, this is the one that has required the most research, labor, time, and patience. When you see the finished patterns, you'll understand, but here's a sneak peek at the works in progress:


This post, somewhat of a tribute to my Aunt, is significant on this of all days because we drove that sometimes treacherous 60 minutes from Manchester to Hampton every Thanksgiving morning to have dinner and spend a wonderful holiday with Dad's entire side of the family. I've been told many a time that Mom went into labor (with me) right after one of those dinners, but that's a story for another time...maybe next year. Happy Thanksgiving and much love to one and all.
Saturday, November 20, 2010
A Plug for Megan
You know, it just occurred to me that the way Megan and I support each other you'd think we'd been friends forever. Truth be told, one of us found the other's blog shortly after I began writing mine and we became fast internet friends. Who knows if we'll ever actually meet in person, but we share common interests and a very healthy respect for one another. That said, as SUPREME RULER of the Big Girl Blog, I command you to visit Megan's blog and check out her giveaway week. Today is the last day she'll be listing giveaways, but entries begin closing on the 24th (?)....yeah, okay, so maybe I should have checked before I began writing, huh?
And if you don't recognize me as supreme ruler I'll get over it, but do yourself a favor and check out her blog anyway because the giveaways this week are great (two of them are from Yours Truly) and because the premise of her blog is awesome! It's called Crochet Every Day. She's posting one pattern each day in 2010 and she's working every one of them. Her goal is to finish all 365 projects by 2014 and she's well on her way. (Good thing it's not a leap year, huh?) If you're not a crocheter, check it out anyway; you may become one.
NOW GO! THE SUPREME RULER COMMANDS YOU. Pay no attention to the woman behind the afghan. ;o)
Tuesday, November 16, 2010
Free Stuff! Get Your Free Stuff!
Hey everybody! My pal Megan over at Crochet Every Day is having a giveaway week and today's prize is your choice of any of my single patterns, so get your fingers over there and enter for your chance to win. Why are you still here? You should be HERE! Now go! ;o) Love ya!
Monday, November 15, 2010
Filler, Fluff, or Writer's Block?
None of the above, actually. Although I'd love to post faithfully and on some sort of a schedule, I simply have yet to find a routine that works for me, so I offer this instead. I've got some terrific friends/readers/customers in cyberspace who are gracious enough to allow me to use their photos here on the ole blog. I love that these kind folks have given me permission to show off their completed versions of my patterns. Take a gander at the latest batch:
 |
| Marrisa/Javamama on Ravelry Big Girl Scrubby in Pisgah Peaches n Creme with Aunt Lydia's #10 cotton |
 |
| Stacy/Vachick on Ravelry Big Girl Scrubby |
 |
| Bonidee on Ravelry Big Girl Scrubby in Lion Brand cotton |
 |
| Megan/Themegababe Big Girl Scrubby in Pisgah Peaches n Creme |
 |
| Basanja on Ravelry Big Girl Scrubby in Pisgah Peaches n Creme |
 |
| Jenny/Craftywabbit on Ravelry Big Girl Scrubby in Pisgah Peaches n Creme (she got 3 from 1 2oz. ball) |
 |
| Megan/Themegababe on Ravelry Tiny Bubbles Scrubby in Pisgah Peaches n Creme with #10 cotton |
 |
| Jennifer/sshisher22 on Ravelry Tiny Bubbles Scrubby in Pisgah Peaches n Creme with #10 cotton |
 |
| Megan/Themegababe on Ravelry Grandpa's Sweater Scrubby in Lily Sugar n Cream |
 |
| Linda via email Grandpa's Sweater Scrubby pattern test |
If you'd like me to feature your finished pieces here, email photos to me at BigGirlJewelry@yahoo.com or post them on Ravelry by linking your project to the pattern page. (Ravelry lets me know when pics are linked to my patterns.) I make no claims to the rights of your emailed photos EXCEPT that I assume if you've emailed them to me it's okay for me to post them here. If I want to use your photo anywhere else, I will contact you for permission. I will not post Ravelry photos without first asking permission, BUT we all make mistakes. If I have mistakenly posted your photo without your permission, please let me know and I will remove it.
Thank you all for your continued support. Happy Crocheting!
Tuesday, November 2, 2010
Change-Up, Just for Fun. . .Free Crochet Pattern
I like playing with new ideas that incorporate environmental responsibility with crochet, or crafting in general for that matter. That's why I started dabbling with scrubby sacks or soap sacks a while back. Call them what you will, if you haven't encountered them before, I'll give you a brief explanation. Pretty much, a scrubby sack is something my brother and I though WE invented in the tub when we were kids. We took our washcloths, wrapped them around our favorite bar of soap, and used the whole package to scrub us clean. Boy, did we think we were brilliant...LOL Fast forward to last winter when I started surfing the web for cute little quickie projects to keep my itchy fingers busy during the cooler months so I wouldn't start yet another afghan. I came across what many crocheters called scrubby sacks which took our "invention" one step further. It's simply a cute pouch crocheted in an hour or two that's closed with a simple drawstring. It's large enough to hold a full sized bar of soap, but my favorite part is that it's a great way to collect all those soap scraps sitting at the bottom of your soap dish so they're large enough to handle. I'm cheap; I like to use every little bit of that soap, especially since I use a more pricey brand for my sensitive skin.
An added bonus to this pattern is that it's pretty (you like how I toot my own horn there?) so wrap a small gift in tissue, drop it in the sack, and your cute crochet project turns into a reusable gift bag! Think about it: wouldn't a gourmet bar of soap make a great grab gift when given inside a delightful little pouch? Anyhow, I'm giving you the simple, round pattern here. I have a couple of oval variations available in my Etsy and Ravelry shops as a set bundled with the pdf version of this one.
I have but one request if you make this pattern: please come back and leave a comment to let me know how you felt about the instruction. The oval patterns were tested extensively, but this one was typed up a while ago and not really well tested. (I couldn't decide exactly what to do with it.) Just as with any of my patterns I would love to see your finished projects. I'd like to post a collection of photos some time before Thanksgiving, (maybe even ON Thanksgiving) to show off readers' handiwork.
As always, Happy Crocheting!
Round X-Stitch Pouch
Crochet Pattern
by Laurie Laliberte, Big Girl Jewelry & More

Special stitch used: X-stitch -- skip next st, work dc in next st, work dc in previously skipped st around the dc you just made
To begin a round of X-stitch, skip the first 2 sts, work dc in next st, work dc in 2nd previously skipped st around the dc you just made
To begin a round of X-stitch, skip the first 2 sts, work dc in next st, work dc in 2nd previously skipped st around the dc you just made
To end a round of X-stitch, work your last dc around the beginning ch3 of the round in the 1st skipped stitch.
Supplies Needed:
2 oz (95 yds) worsted weight cotton yarn (example was made using less than 1 ball Lily Sugar 'n Cream)
size H-8 (5.0 mm) crochet hook
size J-10 (6.0 mm) crochet hook (optional)
stitch markers or scrap yarn (optional)
yarn needle or smaller hook for weaving in ends
All instructions use American terminology and standard abbreviations
with smaller hook ch4, join w/sl st in 1st ch to form a loop
Round 1: ch4 (counts as dc, ch1), [dc, ch1] 8 times, join in 3rd ch of ch4 (9 dc, 9 ch1 sp)
Round 2: sl st into ch1 sp, [ch 4 (counts as dc, ch1), dc, ch1] all in same ch1 sp, join in 3rd ch of beg ch4 (18 dc, 18 ch1 sp)
Round 3: sl st into ch1 cp, ch5 (counts as dc, ch2), [dc, ch2] in each ch1 sp around, join in 3rd ch of beg ch5 (18 dc, 18 ch2 sp)
Round 4: ch1, sc in same st as joining, 2 sc in ch2 sp, [sc in next dc, 2sc in next ch2 sp] around, join in 1st sc (54 sc)
Round 5: ch3, X-stitch around (27 X-sts)
Round 6: ch1, sc in each st around, join in 1st sc (54 sc)
Round 7: ch4 (counts as dc, ch1), [sk next st, dc in next st, ch1] around, join in 3rd ch of beg ch4 (27 dc, 27 ch1 sp)
Round 8: sl st into ch1 sp, ch4 (counts as dc, ch1), [dc, ch1] in each ch1 sp around, join in 3rd ch of beg ch4 (27 dc, 27 ch1 sp)
Round 9: repeat Round 8
Round 10: ch1, sc in each st and ch1 sp around, join in 1st sc (54 sc)
Round 11: ch3, X-stitch around (27 X-sts)
Round 12: ch1, sc in each st around, join in 1st sc (54 sc)
Round 13: ch4 (counts as dc, ch1), [sk next st, dc in next st, ch1] around, join in 3rd ch of beg ch4 (27 dc, 27 ch1 sp)
Round 14: sl st into ch1 sp, ch4 (counts as dc, ch1), [dc, ch1] in each ch1 sp around, join in 3rd ch of beg ch4 (27 dc, 27 ch1 sp)
Round 15: repeat Round 14
Round 16: ch1, sc in each dc and ch1 sp around, join in 1st sc, fo (54 sc)
Drawstring:
with larger hook ch 70, fo leaving a 1-2" tail at each end, Separate the strands of the yarn to form mini tassels. Weave the drawstring through desired row of dc, ch1 spaces.
 About my work:

Any pattern I design and post is my property. Please do not duplicate my patterns for any reason especially to sell. Instead, please link to my blog (http://biggirljewelry.blogspot.com/) or to the page where you found the pattern when referencing one of my patterns.
You are more than welcome to offer finished products made from my patterns for sale. I see no reason why you should not profit from your hard work. However, I'd really appreciate it if you gave me credit for the design; please reference my blog or the pattern page.
If you do make any of my patterns I'd love to see your finished items; please take a moment to email pictures to me.
If you are not interested in making your own pieces, I occasionally offer finished items in my shops. I also welcome special orders, so email me and let's work together.
BigGirlJewelry@yahoo.com
I would love to see your finished projects! Please send me photos. With your permission, I will post them on
Ravelry http://www.ravelry.com/designers/laurie-laliberte/patterns
and/or Etsy http://www.etsy.com/shop/BigGirlJewelry
and/or my blog http://biggirljewelry.blogspot.com/ .
Wednesday, October 6, 2010
Back Atcha' -- A Two Legged Trip into My Crazy World
As my own customer service representative part of my job is reading and answering emails sent from hither and yon. (I'm proud to say that I've had blog hits from people in 60 different countries!) I've been getting some interesting emails from blog readers and customers lately asking me questions that required more than just a minute to answer. Today, I thought I'd take a few minutes to share two of those with you along with the answers I sent because they offer some insight into my creative process and some useful information about my finished projects.
 |
| Grandpa's Sweater Scrubby |
I enlisted the help of Linda, one of my loyal customers, to test the "Grandpa's Sweater" scrubby pattern (thanks again, Linda!) which began a somewhat lengthy string of emails back and forth about the pattern itself and the creative process. In one, she mentioned that she'd thought about working a craft fair or two with items she made and also asked if I often used other testers.
Here's part of my reply:
Every pattern I work goes through a different process. Let me sort of walk you through the one you tested:
1. draw it on paper in the proportion I envision
2. find a tutorial on how to crochet cables because if I've ever done a project with cables in it, it was about 20 years ago
3. crochet, frog, crochet, frog, crochet, frog, crochet... (yep, only four times with this one)
4. finally get to a finished product that is close to my original design but more practical for the intended use (KISS) taking notes as I go
5. actually write the pattern pretty much as it will appear when it gets to your hands
6. frog the prototype and remake it following my instructions--this time with the #10 thread added
7. type it up, add pictures, convert to .pdf
8. beg my best customer to test it for me (LOL, but no joke!) and send her the .pdf
I did send it to another online friend [ed: That would be Megan!] who's great at finding my typos and any confusing language, but she hasn't actually made the pattern. I was an English major (not for long, but I was), so the writing part is usually a pretty smooth but time consuming process. This was the first time I used an actual tester because I know this pattern looks intimidating to a newbie and I really wanted to make sure that just about anybody could pick it up and make it without having to tear it apart. Nothing makes me more nuts than paying for a pattern written in the designer's shorthand. Heck, I could write it in shorthand and not pay someone to do it for me. This may be work for me, but it's a hobby too. Like you, when I pick up a pattern written by someone else, I want to have the thinking done for me. . .
. . .The reason I give my blessing to sell the finished product is pretty simple. I want to do it too! Last year I did a couple of small Holiday craft fairs (selling my handmade jewelry) and they were so much fun. I found myself crocheting small pieces all winter and selling them at a small local flea market. My nephews are all about stuffed animals, but paying up to $15 for a pattern you can only use once is not a smart idea in my book, so I choose which patterns I purchase carefully. They love that they can show them off and say, "My Auntie MADE this for me." One of the factors I think about when I purchase a pattern is "can I sell the finished product?" Not just whether it would sell, but will I be allowed. Let's face it, I could crank out my scrubbies and sell them on Etsy and have another two or three people on Etsy doing the same thing. So what? There are so many sellers on Etsy that few people are going to notice that two are selling identical items and how many of those scrubbies can one person make anyhow? I figure if you took your time and did all the work, you deserve a couple of bucks for it. Besides, I would love to have people tell me they're going out and selling my stuff and meeting new people and having a great time doing it. . .
* * *
This one's from Leah and it's typical of a conversation I may have had when I worked as a "department store retailer.":
 |
| Big Girl Towel and Pot Holder in progress |
Hello! I stumbled upon your patterns while looking for a good kitchen set (I'm making a wedding gift a bit last minute) and fell in LOVE with your Big Girl set. The elegance of it instantly caught my eye. And then I dug a little deeper, scrolled down the blog, found your other sets, and now I'm having trouble deciding which set of beautiful craftsmanship I want to imitate. So my question is, do you have any comments on the effectiveness of the individual sets? Which potholders are thicker, which scrubbies are more effective, which towels are more absorbent? And also, have you ever adapted one of your patterns for a round potholder? If you have, I would love to buy that as well. Totally understand if you can't accommodate my greediness (not to mention indecisiveness...) but I wanted to get your thoughts before I dove in any further.
And here's my (edited) answer:
First things first: The absorbency of the individual item will be dependent upon the yarn you use. I've found that I really like (okay, absolutely, totally LOVE) the softness and loft of Peaches 'n Creme by the Pisgah yarn and dye company. Lily Sugar 'n Cream isn't quite as fluffy soft, but that means it's going to scrub a bit better. Regardless of which yarn you choose, using a #10 crochet cotton held together with your worsted weight yarn to make a scrubby will give it a bit of extra texture to help get your dishes clean.
First things first: The absorbency of the individual item will be dependent upon the yarn you use. I've found that I really like (okay, absolutely, totally LOVE) the softness and loft of Peaches 'n Creme by the Pisgah yarn and dye company. Lily Sugar 'n Cream isn't quite as fluffy soft, but that means it's going to scrub a bit better. Regardless of which yarn you choose, using a #10 crochet cotton held together with your worsted weight yarn to make a scrubby will give it a bit of extra texture to help get your dishes clean.
Other tips I've received for making scrubbies include using a worsted weight acrylic instead of cotton or using nylon netting that you can purchase at the craft store in rolls. I prefer the cotton because my goal is to avoid synthetics whenever possible.
On to the specifics: All of the towels will have pretty much the same absorbency.
 |
| BGJ Towel Collection |
The thickness of the potholders is defined by the density of the stitch used. The Chubby Nubby and Tiny Bubbles styles have the closest, tightest texture which makes them my thickest designs followed by the Broken Links. Grandpa's Sweater and Big Girl won't be quite as thick. All of the pot holders are two layers thick in the interest of safety, but I cannot guarantee that they will protect your hands for long periods at very high temperatures. As with any kitchen item, use care and common sense when you're handling hot tools and pans.
The same goes for the scrubbies; the Tiny Bubbles and Broken Links will probably give you a bit more "tooth" because of their texture, but the addition of the crochet cotton helps to level the field a bit. When I sit down to design a new set, I begin with the scrubby because I want to make sure that the texture of the design will clean your dishes not just look pretty hanging over your sink.
As for a round pot holder... I really hadn't thought about it. I'll add it to my ever expanding list of things to do.
* * *
Here's one last tip that helps me when I'm working a pattern: If you find that the decorative portion of your project is wider than the rest of it (which can happen with a towel and is actually specified in at least one of my patterns), go down one hook size for that part, then return to the recommended size when you return to the more basic area.
As always, I very much enjoy receiving emails and comments from any of my customers and readers. I do my best to answer them in a timely manner and they never fall on deaf ears. I worked for a series of major department stores for more than twenty years and the most important thing I learned from that experience is how NOT to do business. Rather than follow the old rule "The customer is always right," I prefer to live by my own rule: "It doesn't matter who's right! Make the customer happy." If I can develop a design, be it crochet or jewelry, in which the customer has been a participant, and the customer/client/patron/friend is happy, I'm happy. Thank you all for visiting, reading, sharing advice and feedback, and most of all inspiration.
Friday, October 1, 2010
Azriel
 |
| May 1997-October 2010 |
As though there is nothing more
No hereafter
No white light
I know
In my heart of hearts
Her soul lives
Beyond this life
Travel on old friend
I grieve
And in my grief find strength
To persevere
To live well
Subscribe to:
Posts (Atom)