
Haven't we had enough of reading around here for a little while? I think it's time to get our crochet on and I've found the perfect way to do it. A while back, Samantha emailed me and told me about these great towels she makes using a portion of my Big Girl Towel pattern. I can't remember how it all went down, but we basically decided that she should write up a tutorial that we could each post on our blogs. I think you'll agree with me that the towel and the yarn colors she used for her example are awesome. (I love pink.) Anyhow, please welcome Samantha and her rockin' kitchen towels.

I have been asked a few times how I make my Kitchen Towel
Toppers:
The crocheted top I use is fashioned after top of Laurie’s
hanging kitchen towel patterns (I have most of them), so I asked her if she
minded if I created a tutorial and I use her pattern for reference. Her idea was for me to do this guest post and
I happily agreed.
I have made these using worsted weight yarn and dk weight
yarn. I think you could easily adapt it
for other weights as well.
Materials needed to start:

· Yarn
· Scissors
· Towel
· Needle (I use a tapestry needle, but that means I need a thimble to push it through sometimes)
First thing you need to do is cut the towel in half. You really only need one half of the towel
and on the plus side you get more for your money!

I don’t really worry about this being perfectly straight
because in the end it is going to be somewhat gathered.
After the cut is made, thread your needle with a
long piece of yarn. I now make mine
really long because one time I made it too short and had to redo it and that
was not fun.
Next you want to fold down the top of the towel like so:

Folding the towel down like this makes it so you don’t have
any raw edge exposed.
Next we want to put the needle through so that the knot is
on the edge in the back.

Then we want to start doing the blanket stitch (youtubetutorial found here) across the top of the towel. Make sure to continue to fold the very top
down so the cut edge is not exposed. You
can pin this edge if you want to make it easier for you.


Here’s how mine looks from the back with the top folded
down.

Once you have gone all the way across make sure you knot it
in the back.

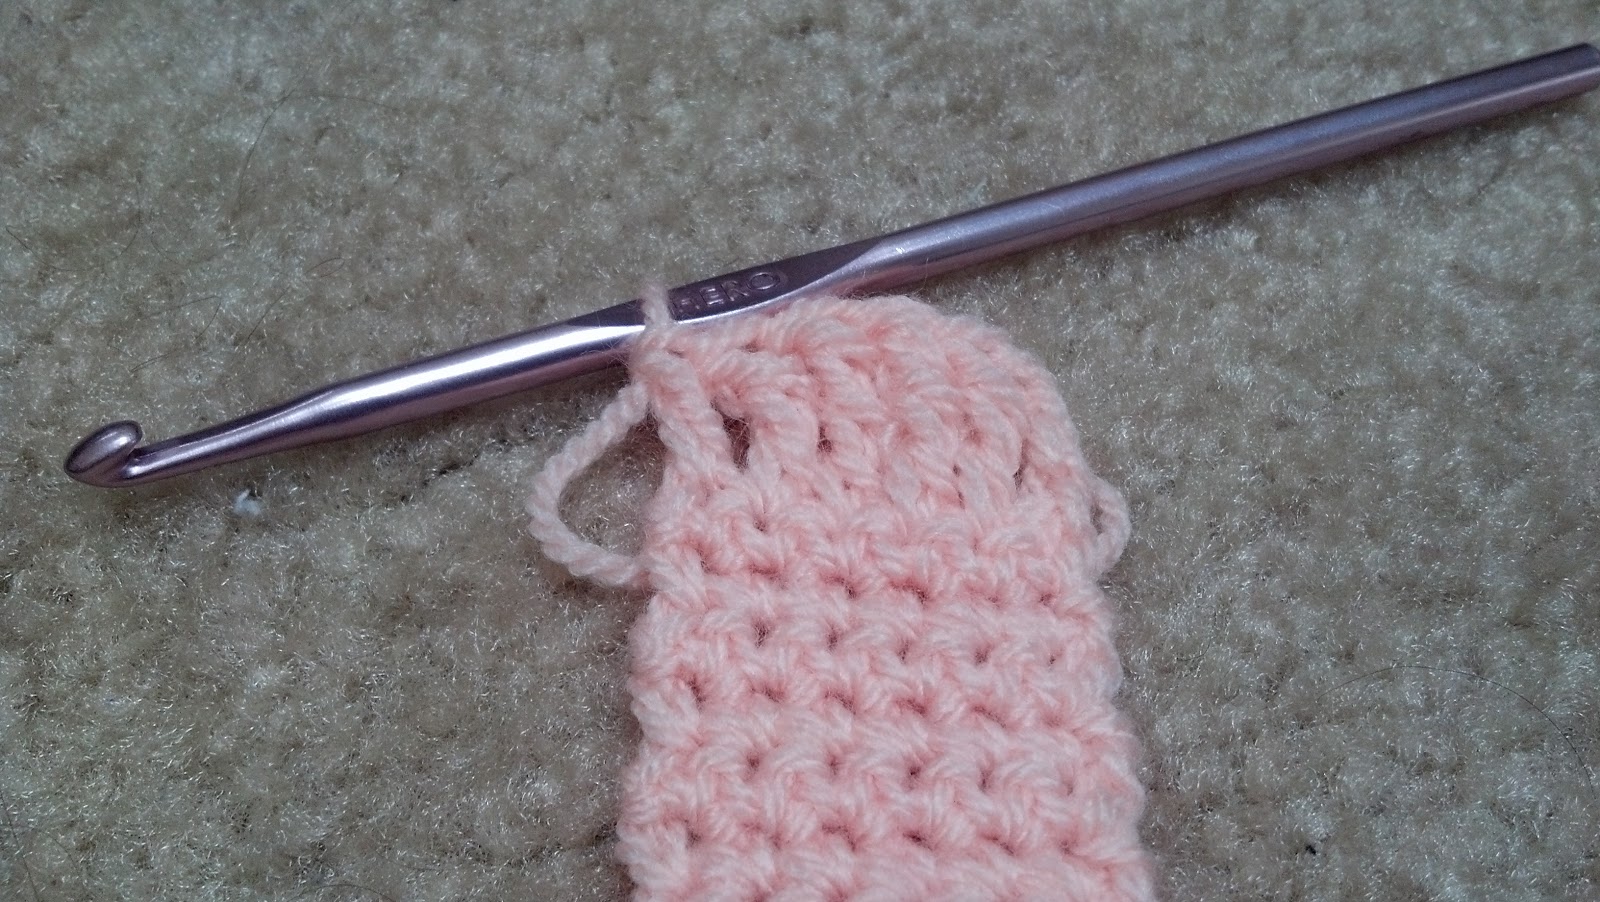
We are going to put one sc in each blanket stitch, so make
sure to keep the stitches fairly close together. Although the thicker the yarn you use the
farther apart the stitches can be. I am
using dk yarn in this example.
Now you can start doing sc across the blanket stitch. I use a larger hook than recommended for the
yarn with these, but it is all what you are comfortable with.


Now once you get to the end just chain one and do a few more
sc rows. For worsted weight I tend to do
4 rows, but for this example in dk I did 5 rows.

If it starts to pull in a little that is okay. We are going to start gathering it and
decreasing anyway.
This is where I start to use Laurie’s pattern (Free
Big Girl Kitchen Towel). We want to
sc dec
(A sc dec is insert hook into both
loops of first stitch being worked, yo, pull up a loop, insert hook into both
loops of next stitch, yo, pull up a loop, yo, draw through all 3 loops on hook)
over the next few rows to get down to 6 stitches. Now this all depends on how many stitches you
have. In this example I have 54
stitches.
So first row I just do sc dec all the way across and I end
up with 27 stitches.


Next I sc dec 7 times, 1 sc, sc dec 6 times to get to 14
stitches.

Then I did sc dec 2 twice, dec over 3 stitches twice, then
sc dec twice to get down to 6 stitches.
(dec over 3 stitches is insert hook
into both loops of first stitch being worked, yo, pull up a loop, insert hook
into both loops of next stitch, yo, pull up a loop, insert hook into both loops
of next stitch, yo, pull up a loop, yo, draw through all 4 loops on hook)

Once down to 6 stitches, chain one and sc across.

Continue making the 6 stitch rows

I did about 20 rows.
Next, once it is long enough you will do the row that will
become your button hole.
From Laurie’s pattern:
Note: Before proceeding, you may wish to fit your hanging loop to the place where you'd like it to hang. If worked as instructed it will fit the average drawer pull or oven door handle. If you need to add length simply continue repeating Row 64 as necessary.
Row 82: ch3 (counts as dc), trc in next st, dtrc in next 2 sts, trc in next st, dc in next st, turn (6 sts)
Note: The space between the two dtrc is your buttonhole.
Next you want to chain one and sc in the first two sts, two
sc in each of the next two sts, and then sc in the last two sts, do not bind
off.

Next, you want to sc down the side and stop right where you
started the decreases.


Fasten off, then start on the other side where the decreases
started.


Fasten off and weave in ends.


Sew on a button of your choice.


Sam, I can't thank you enough for dropping in to do this. I LOVE this idea and am going to have to make a couple for a friend this week.
By the way, folks, you can find Samantha's blog HERE.
Happy Crocheting!
I always wondered how it got started! Now I know. Thanks for the tutorial!
ReplyDeleteHey Nan! Thanks for stopping by. I never really thought about it before this, but the blanket stitch is pure genius. I've seen crocheters fight to punch holes in their fabric so they could begin with single crochet and that just seemed like too much work. I love this technique. I may take a walk to the dollar store around the corner today, just so I can get started.
Delete