"No matter how terrified you may be, own your fear and take that leap anyway because whether you land on your feet or on your butt, the journey is well worth it."
-- Laurie Laliberte
"If your dreams do not scare you, they are not big enough."
-- Ellen Johnson Sirleaf
"Life shrinks or expands in proportion to one's courage."
-- Anais Nin
Showing posts with label free. Show all posts

Sunday, August 23, 2015

So I Needed a Hand Towel for the Bathroom...

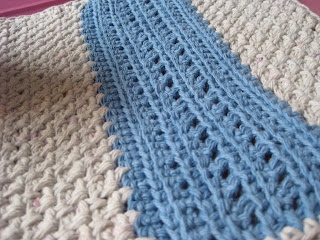
Seriously! That's how this design came to be. I needed one more pattern to round out the "Table and Tub" group from my Blog Collection and I toyed with several ideas: table runners, napkin rings, oven mitts . . . But nothing clicked for me. Then, one day, I found myself using a store-bought kitchen towel as a placemat. I was eating lunch at my desk and didn't want to get food on my laptop, so I draped the towel over it. After the lightbulb turned on over my head, I set to work and threw together a few notes and a quick sketch.

It's taken me about two years to get around to actually working and writing the pattern, but here it is. I finally knuckled down to make this because I realized we only had two hand towels for our bathroom. Of course, I love a pattern with some versatility, so I've included instructions for adding that cute little hanging loop you see on the corner. That's where the hand towel thing figures in. This little guy is just the right size to use for a placemat or as a hand towel. Besides, I like the way it looks in the bathroom hanging from that little loop.

Have fun with this one!

The Blog Collection
Placemat Pattern
by Laurie Laliberte Designs

A simple pattern to protect or accent your table top. Make a full set for yourself or to give as a hostess gift.

Finished Measurements:

approximately 12" x 16"

Supplies Needed:

size I-9 (5.5mm) crochet hook

about 2 oz. worsted weight yarn in Color A
about 1 oz. worsted weight yarn in Color B
smaller hook or yarn needle for weaving in ends

Samples were stitched using 100% cotton Sugar 'n Cream and/or Peaches & Creme worsted weight yarn.

All instructions use American Terminology.

Special Instructions:

BLO -- back loop only
FLO -- front loop only

Instructions:

Notes:  Each row is 39 sts across.

If you are working in two colors, change colors at the beginning of the Rows with the *.

ch 40

Row 1:  sc in 2nd ch from hook, [ch1, sk next ch, sc in next ch] across, turn

Row 2:  ch1 (does not count as 1st st here or in following rows), sc in 1st sc, sc in next ch1 sp, [ch1, sk next sc, sc in next ch1 sp]

Row 3:  ch1, sc in 1st sc, [ch1, sk next sc, sc in next ch1 sp] across, ending w/sc in last sc, turn

Rows 4-10:  repeat Rows 2-3 ending w/a Row 2

*Row 11:  ch1, sc in each sc and ch1 sp across, turn

Row 12:  ch1, sc in BLO of each st across, turn

Row 13:  ch1, sc in FLO of each st across, turn

Row 14:  ch1, sc in BLO of 1st st [dc in BLO of next st, sc in BLO of next st] across, turn

Row 15:  ch1, sc in FLO of 1st st [sc in FLO of next st, dc in FLO of next st] across ending w/sc in each of last 2 sts, turn

Row 16:  rep Row 14

Row 17:  rep Row 15

Row 18:  rep Row 14

Row 19:  ch1, sc in FLO of each st across, turn

Row 20:  ch1, sc in BLO of each st across, turn

Row 21:  rep Row 19

*Row 22:  ch1, sc in 1st st, [ch1, sk next st, sc in next st] across, turn

Row 23:  ch1, sc in 1st sc, [sc in next ch1 sp, ch1, sk next sc] across ending w/sc in each of last 2 sts, turn

Row 24:  ch1, sc in 1st sc, [ch1, sk next sc, sc in next ch1 sp] across ending w/sc in last sc, turn

Rows 25-57:  rep Rows 23-24 ending w/a Row 23


Finishing Round:

sc evenly around working 3sc in each corner
  
Optional Hanging Loop:

ch 10, sl st in 1st sc of Finishing Round, sl st in each ch back to beg, sl st to close loop at base

finish off, weave in ends
  
Designer's Note:

Any pattern I design is my intellectual property. Please do not duplicate any of my patterns for any reason especially to sell. Instead, please link to my blog or to the pattern page in one of my shops when referencing one of my patterns.

You are more than welcome to offer finished items made from my patterns for sale. In fact, I encourage it. However, I'd really appreciate it if you gave me credit for the design. Please reference my blog or the pattern page.


Happy Crocheting!

Sunday, August 16, 2015

Caffeine and Sugar

I'm not the huge coffee drinker I once was. Before the cause of my chronic fatigue was finally diagnosed, it was no unusual feat for me to consume well over a pot of strong, straight, black coffee every day. Yep, no sugar, no cream, no flavor, just brew and serve. I was so sick, so far gone, that I could barely stay awake for more than a few hours at a time without mass quantities of caffeine.

Anyhow, these days I'm medicated; the fatigue is about as under control as it can be; and I only drink coffee when I honestly want a cup, not need one. While I still generally take my coffee black, no sugar, I'll pretty much drink it any way you hand it to me. Every so often, I get a yen for a gigantic iced coffee from Dunkin' Donuts. That's when I hit the drive thru and order an extra large, extra, extra. (For those of you not in the know, that's extra cream, extra sugar.) Unfortunately, OKC only has 3 Dunks, and none of them is convenient to my home. To put it in perspective, there were at least six Dunkin' Donuts within walking distance to where I last lived in the Greater Boston area.

I decided to share this recipe with you today because I've received so much positive feedback regarding the chai latte recipe on my main page. It brings a smile to my face every time one of my readers mentions it here or elsewhere on social media. The surprise is that it happens more often than I ever expected it would.

Today, I offer you the coffee concoction I'm most likely to make when I'm in the mood for something more adventurous than black, no sugar. So fire up the coffee maker and follow me . . .


French Vanilla Iced Latte
the cheap and easy way

1 12-cup pot of freshly brewed coffee (about 1 quart)
1 quart unsweetened vanilla almond milk (or milk of your choice)
2 T vanilla extract (not that artificial junk)
1/2 c light agave nectar (or 1 c sugar or measures-like-sugar substitute)

Brew coffee just a bit stronger than you normally would
Add sweetener and stir to dissolve completely
Add milk and vanilla extract, stir to combine
Refrigerate until icy cold
Serve over ice or well chilled


Here's a tip:

Keep an ice cube tray in the freezer filled with coffee. By using coffee ice cubes, you won't dilute your drink.

Happy Caffeinating!

Sunday, August 2, 2015

I Keep Promising This One, So Here it Is!

Since I moved to Oklahoma City, almost three years ago, I've lived with so many roommates I can't even remember them all. Anyhow, once or twice, I've been lucky enough to encounter one who can teach me something new in the kitchen. John was one such person. He'd worked in kitchens, as had his wife, Tascha, and they made a hamburger mix to die for.

You see, before I met this duo, I never really put any thought into experimenting with ground beef patties. My burgers were plain, just meat with maybe a sprinkle of salt and pepper during cooking. I dare say, I have become much more adventurous. Unfortunately, the mix of seasonings John used in his burgers was identical to the one he used for chicken and pork. Eventually, the whole house became very tired of his cooking. No matter how good it tasted, we'd gotten to the point that we preferred a plain bologna sandwich over John's everything-tastes-identical cooking.

The recipe I'm sharing with you today came to be out of necessity. My current roommate and I were both craving John's jalapeno burgers, or a reasonable facsimile thereof. (I don't think we'll ever crave that particular blend again.) So I hit the freezer. All we had was one pound of 90/10 ground beef, not enough for leftovers, and far too dry for decent burgers. My solution? Raid the freezer again and punt.

We both enjoyed our dinner so much that I immediately wrote down the recipe so I wouldn't forget it. But then, isn't that the way many of our favorite recipes come to be?


Robin's Jalapeno Burgers


1 lb. extra-lean ground beef

1 lb. pork and bacon breakfast sausage (the kind that comes in a roll, not in links)
1 1/2 med jalapenos, chopped (or substitute about 2t of sriracha)
1/2 med yellow onion, chopped
1 T granulated garlic
salt and pepper to taste

In a large bowl, combine all ingredients (do not overmix or your burgers will fall apart during cooking)
Form into 8 balls* about 1/4 lb. each, and let rest in refrigerator for about 30 minutes
Place in very hot pan
After about 1 to 1 1/2 minutes, flatten into patties* and continue to cook until they've reached desired doneness
Dress as desired

*If you're grilling, form them into patties, not balls and do not flatten during cooking

Happy Cooking!

Saturday, July 25, 2015

I'm Posting a Day Early Because. . .

It's Christmas in July! that time of year when some of us are panicking because we only have five months left to make all those homemade gifts. Others are just beginning to make them and completely relaxed. So who will still be hooking away on Christmas Eve?

My advice? I tend to go by the KISS rule: Keep It Sweet and Simple. Along that vein, I leave you with a Christmas in July present for those oft forgotten fur babies. My roommate's kitten loves these things. So much so, that she keeps stealing my samples before I can photograph them.


Keep it Simple Cat Toy
by Laurie Laliberte Designs


This fun and simple project is a great pick-up gift to sell at craft bazaars or just to make for your favorite fur babies. I use a single plastic grocery bag to stuff the ball*, but a small amount of polyester stuffing works well too.

The design includes a reinforced chain with a finger loop at the end to make it an interactive toy, but many cats are just as happy to knock it around the house without any prompting from the people they own.


Finished Measurements:

ball, approximately 2" in diameter
string, approximately 12" long


Supplies Needed:

size G-6 (4.0mm) crochet hook
small amount of worsted weight yarn
small amount of polyfil or one plastic grocery bag for stuffing
small hook or yarn needle for weaving in ends

All instructions use American Terminology.


Instructions:

Round 1:  sc 6 in magic loop (6 sts)

Round 2:  2sc in each st around (12 sts)

Round 3:  [2sc in next st, sc in next st] around (18 sts)

Round 4:  [2sc in next st, sc in each of next 2 sts] around (24 sts)

Rounds 5-9:  sc around (24 sts)

Round 10:  [sc dec in next 2 sts, sc in each of next 2 sts] around (18 sts)

Note:  Now is the best time to stuff the ball, just be careful that you keep your stuffing inside as you close the ball.

Round 11:  [sc dec in next 2 sts, sc in next st] around (12 sts)

Round 12: [sc dec in next 2 sts] around (6 sts)

Continue sc dec until the top of the ball is closed OR close by stitching with a yarn needle.


Optional play string:  

chain 50, sl st in 10th st from chain and in each chain back to the top of the ball, end with sl st to top of ball, fo, weave in ends


*While this item is machine washable, if you choose to stuff it with a grocery bag, make sure you wash it in cold water and DO NOT tumble dry it.

Missy the Toy Thief keeps swiping my samples. I think I've made seven so far.


Merry Christmas in July!

Sunday, July 19, 2015

Getting My Feet Wet Again

I walked away from blogging for a while. I was overwhelmed at the time. Work, home, health issues, were all taking up time and blogging was just an added stress I didn't need. Anyhow, most of the crazy is done with and I'm more motivated to blog since I recently jumped over the 500,000 page views hurdle. (I can't believe it.) I never expected my little blog to get so many hits. Granted, I'm no Bloggess; she probably gets that in a month, but I'm grateful for everyone who pays me a visit. 

Okay, ego stroking aside, let me drop off my poem (not suitable for children) and get back to real life for a bit until I can hit you again with a free pattern my newest roommate absolutely adores. 

Working for Free 
good enough to be your bitch
but not your whore
whores get paid
dangle that carrot and I follow
like a good little pony
shiny coat and obedient
but most important
willing to drop everything
to serve at your side
no matter what the cost

See you next week!

Monday, September 15, 2014

Pinterest Has Me Cooking Again!

Okay, truth be told, I never stopped. I just didn't have the time for posting about it. Some months, it's difficult enough for me to maintain my weekly schedule, let alone trying to post semi-weekly. Anyhow, I chose to take over Sunday's post for Pinterest recipes this week because the two I made this week were yummilicious and I had to share.

I'm going to begin with dessert since I make this one first, and well, dessert . . .


I really hope the blogger doesn't mind me borrowing her picture because this one didn't last long enough to take one. (I think that's a theme around here.) It was outstanding, and my roommates absolutely loved it. I, however, think it needed more oats, so I'll probably double the oats the next time I make it. Still, simple, delish, and by putting it together before dinner, I could throw it into the oven to bake while we ate. Perfect timing never tasted so good.


This is another with no picture. Sorry gang, but yesterday morning, when I made it for dinner, I couldn't predict I'd be out of the house when the hordes descended upon the slow cooker.

I have to admit, I took a few liberties with this one. First, it desperately needed pepper, so I added some at the end. Cooking pepper makes the flavor expand and you run the risk of making a dish too spicy, especially in the crock pot. Second, I used homemade chicken stock that I had in the freezer. It was left over from another Pinterest recipe that I will probably share my thoughts on at a later date.

But here's the kicker: By the time I got home, it was GONE! I walked into the kitchen around 2:00 a.m. to find nothing left of my chicken and dumplings but the broth. So I ladeled some into a mug and had an early morning snack. It was excellent.

Later, I found out the one of my roomies was wise enough to fill a dish and tuck it away so I could taste the fruits of my labor. It was even better when I had it for lunch this afternoon. And the rest of the leftover broth? We've been taking turns heating it up in mugs to stave off this unseasonably chilly weather.

So there you go, two tested Pinterest recipes that are definitely worth a try.

Happy Cooking!

Sunday, July 13, 2014

I See You! (free crochet pattern)

Yeah, yeah, yeah...I know it's been a while since I've treated you to a new, free pattern, but I plan to make up for it. The prototypes for the book are basically made. The rough drafts of all the patterns are written. All that's left is a bit of spit and polish, and a whole lot of high quality picture taking. Until then, you get to reap the benefits of a newly finished project:


The Blog Collection
Eyeglasses Case

Supplies:
small amount of Color A
small amount of Color B
size G (5.0 mm) crochet hook
smaller hook or yarn needle for weaving in ends

Note: All instructions are in American terms. This pattern is worked in the round which may make your beginning stitch travel (as when working amigurumi). Instructions are given at the best places to correct stitch position so that color changes are obscured. There is no need to join and ch1 at the end/beginning of each round.

ch 15 w/Color A

Round 1: sc in second ch from hook and each ch across, turn, sc in unused loop of each ch across (28 sts here and throughout)

Round 2: sc in each st around

Rounds 3-10: repeat Round 2

Lay your project flat. If your last stitch is not at the side of the pouch, add or remove stitches until it is. Change to Color B.

Round 11: sc in each st around

Round 12: sc in BLO of each st around

Round 13: rep Round 12

Round 14: [sc in BLO of next st, dc in BLO of next st] rep around

Round 15: [dc in BLO of next st, sc in BLO of next st] rep around

Note: Yes, at the end of Round 14/beginning of Round 15, you will work two dc side by side.

Round 16: [sc in BLO of next st, dc in BLO of next st] rep around

Note: Yes, at the end of Round 15/beginning of Round 16, you will work two sc side by side.

Round 17: rep Round 15

Round 18: rep Round 16

Round 19: sc in BLO of each st around

Rounds 20-21: rep Round 19

Lay your project flat. If your last stitch is not at the side of the pouch, add or remove stitches until it is. Change to Color A.

Round 22: sc in each st around

Rounds 23-24: sc in each st around

Stop here and slide your glasses into the pouch. You should have about ½" of space from the top of the glasses to the end of the case so your glasses don't easily slip out on their own. If not, continue to add rounds of sc until you do.

Lay your project flat. If your last stitch is not at the side of the pouch, add or remove stitches until it is.

Optional Hanging Loop: join w/sl st in next st, ch 10, join w/ sl st in same st, sl st in each ch back to first ch

Optional Button Closure: Find the middle front of your project and mark it for attaching your button. Find the corresponding stitch on the back of the project and mark it for the button loop.

sc in each st stopping at marked st on back of project, ch12, attach in same st w/sl st, sl st in each ch around loop, sc in next st and each st around

finish off, weave in ends

This pattern has been tested only by me. If you find a mistake, please leave it in the comments below and I will make the necessary corrections. If you need help, feel free to post any questions in the comments and I will get to them asap.

Any pattern I design and post here is my property. Please do not duplicate my patterns for any reason especially to sell. Instead, please link to my blog or to the pattern page when referencing one of my patterns.

You are more than welcome to offer finished items made from my patterns for sale. I see no reason why you should not profit from your hard work. However, I'd really appreciate it if you gave me credit for the design; please reference my blog or the pattern page.

If you do make any of my patterns, I'd love to see your finished items; please feel free to email pictures to me.

BigGirlJewelry@yahoo.com

Happy Crocheting!

Monday, February 10, 2014

Single Shoulder Strap Pattern/Tutorial

Just in case you missed it, a couple of weeks ago, I posted the pattern for my Blog Collection Round Hobo Bag, possibly my favorite bag so far. Although that Windmill bag... Maybe I should just refrain from playing favorites.

Anyhow, because the straps of the bags in this collection are meant to be interchangeable, I chose not to post it all in one go. That, and I had yet to write up a coherent pattern.

Please be aware that the instructions for the strap are specific to the Round Hobo Bag, but a quick note about changing it up for other bags follows the pattern.

**********


Single Shoulder Strap

chain 120, do not turn, skip next 54 sts

Design Note:  For now, ignore those 54 skipped stitches, but you may want to mark the first and last skipped stitch so they're easier to find later.

Round 1:  being careful not to twist chain, connect to next st w/sc, sc in next 53 sts, sc in each ch across (174 sts)

Round 2:  sc in each of next 53 sts, skip next st, sc in each of next 119 sts, skip last st (172 sts)

Round 3:  skip 1st st, sc in next 51 sts, skip next 2 sts, sc in each of next 117 sts, skip last st (168 sts)

Round 4:  skip 1st st, sc in next 49 sts, skip next 2 sts, sc in next 115 sts, skip last st (164 sts)

Round 5:  skip 1st st, sk in next 47 sts, skip next 2 sts, sc in next 114 sts, join w/sl st in 1st st (161 sts)

finish off, weave in ends
(opposite side) Round 1:  connect w/sc at 1st skipped st, sc in next 53 sts, sc in each unused loop of ch (174 sts)
Rounds 2-5:  repeat Rounds 2-5 above

finish off, weave in all ends
**********
Modifying this strap to fit any bag is fairly simple. Instead of skipping 54 stitches, use the stitch count of the last row/round of your bag. Divide your total stitch count by two. This is the number of stitches you will skip.
In the coming months, as I post other bags from this series, I will also post the how-to's for their respective straps including a slightly narrower shoulder strap and a much shorter rolled handle. In the meantime, have fun playing with this one.
Happy Crocheting!

Sunday, January 26, 2014

Free Crochet Pattern and a Sneak Peek at the New Crochet Book

Hey y'all! I decided I needed a short (heh) vacation, but I'm back. More important, I'm back with post number 200 here on the blog.

In honor of this milestone, I've brought you a gift: a free pattern you're going to love. As promised, I'm continuing to drop patterns from my new, almost finished, crochet book. This one just may be my favorite of the bunch simply because I'm addicted to round hobo bags.

This week, you get just the basics, the body of the bag, but the recommended amount of yarn is for the whole thing. The shoulder strap pattern/tutorial is something I will share with you within the next couple of weeks.

As usual, I worked the sample in Lily Sugar 'n Cream yarn, but it will work with any worsted weight yarn. The colors here are Hot Pink and Hot Orange. Grab your hook and get to work!

The Blog Collection Hobo Bag

Finished Size:

body – 9" diameter x 11" high
strap – 32" long x 2 ½" wide

Supplies Needed:

3 balls of yarn for body
2 balls of yarn for contrast
size H-8 (5mm) crochet hook
stitch markers or pieces of scrap yarn
yarn needle or smaller crochet hook for weaving in ends

Instructions:

Round 1: using magic ring method, 12 sc in ring, pull ring tight to close gap (12 sc)

Round 2: 2sc in each st around (24 sc)

Round 3: sc in each st around (24 sc)

Round 4: [2sc in next st, sc in next st] around (36 sc)

Round 5: sc in each st around (36 sc)

Round 6: [2sc in next st, sc in next 2 sts] around (48 sc)

Round 7: sc in each st around (48 sc)

Round 8: [2sc in next st, sc in next 3 sts] around (60 sc)

Round 9: sc in each st around (60 sc)

Round 10: [2sc in next st, sc in next 4 sts] around (72 sc)

Round 11: sc in each sc around (72 sc)

Round 12: [2sc in next st, sc in next 5 sts] around (84 sc)

Round 13: sc in each st around (84 sc)

Round 14: [2sc in next st, sc in next 5 sts] around (96 sc)

Round 15: sc in each st around (96 sc)

Round 16: [2sc in next st, sc in next 5 sts] around (108 sc)

Round 17: sc in each st around (108 sc)

Round 18: in BLO sc around (108 sc)

Round 19: sc in each st around (108 sc)

Rounds 20-27: repeat Round 19

change colors*

Round 28: sc in each st around (108 sc)

Round 29: repeat Round 28

Round 30: in BLO sc around (108 sc)

Round 31: repeat Round 30

Round 32: in BLO [sc in next st, dc in next st] around (108 sts)

Round 33: in BLO [dc in next st, sc in next st] around (108 sts)

Round 34: repeat Round 32

Round 35: repeat Round 33

Round 36: repeat Round 32

Round 37: in BLO sc around (108 sc)

Round 38-39: repeat Round 37

Round 40: sc in each st around (108 sc)

change colors*

Rounds 41-55: sc in each st around (108 sc)

do not finish off*

Before you move on to the shoulder strap, make sure this length works for you. If you do follow my instructions for the strap, you'll be adding another five rows (about 1 1/4") to the top of the bag, so keep that in mind as well.

Happy Crocheting!

Monday, December 2, 2013

And You All Thought He Was Done


My pal, Tony Healey, and I have been working on the Far From Home series for such a long time that it's gotten more and more difficult to leave with each installment. This novel/novella was not supposed to be written, or released, for several months, but Tony couldn't help himself. After finishing the twelve-part serial, he thought he was ready to move on to something else for a bit. [spoiler alert] That's why the initial serial had a tight ending with very few loose ends.

But I guess Jessica King and her crew kept calling his name. So here it is, the first in a trilogy set in the Far From Home Universe, and you all get first peek at the first chapter. The book's Official Launch is today although hardcore FFH fans are already buying kindle copies.
**********
1.

Starbase 6 was a welcome sight as it loomed into view. The Defiant slowed from the tremendous speeds of exiting the Jump. As it approached the huge Union space station, Lieutenant Kyle Banks handled the helm controls of the ship with consummate skill.

Feels good to come back here, Captain Jessica King thought to herself. Like coming home.

After more than a year away on a mission of exploration, they had returned to Station 6 for some much needed supplies and minor repairs. The Defiant had also been promised a few upgrades, and Jessica fully intended on making sure she got them.

The old girl could use them, she thought. And the much needed rest . . .

"Starbase control has made contact, Captain," Ensign Olivia Rayne reported from the comm. station, her hand to her earpiece.

King nodded. "Patch me through."

She waited a few seconds for the connection to be made. "Captain Jessica King, Union Starship Defiant."

"Please state your prefix number," an artificial voice said.

"T.U. zero-one-one-three-eight," Jessica said.

There was a brief delay, then the voice announced that they were cleared to dock. "Docking bay three. Please do not exceed standard thruster speed."

"Close channel," King said.

Just like old times . . .

She looked ahead at the large, circular space station. Tall centrifuge at the centre, spokes extending out at the middle to form a wide outer ring. Along the ring were enough docking bays to accommodate up to twenty vessels, with many of the bays currently occupied.

Lieutenant Banks brought the Defiant – an old but well-kept Archon class battleship – to a relative crawl and lined up the port side with the slowly rotating docking ring. At one time, Archon class vessels had been the backbone of the fleet. Now they were little more than relics. While the Draxx war raged, they still had a purpose. But now, in this newfound era of interstellar peace, the Archons were slowly being taken out of service.

Decommissioned. Scrapped. Thankfully, there were no such plans for the Defiant.

Yet.

The thought of her being dismantled, ending up as salvage, made Jessica shudder.

"Aligning to dock," Banks reported, his voice taut with effort as he concentrated on the task at hand. Starbases were not designed to accommodate simple and easy docking manoeuvres.

"Keep her steady, Lieutenant. You know the drill."

"Aye," Banks said. His hands flitted over the controls, the Defiant edging to the left to butt up against the station. "I could do this with my eyes closed."

Jessica smiled. "Well, please refrain from doing so on this occasion, Banks. I'd like my ship kept in one piece for the time being. It'd be a shame to crash just before we park."

"Yes Ma'am," he said with a chuckle.

"Less than two metres clearance," Commander Chang reported from the science and tactical station to the Captain's right. The Defiant nestled up to the dock with a slight bump a moment later.

"Good job Mister Banks. Commander Chang, activate all moorings and equalize atmospheres," King ordered. She got up from the captain's chair. The Defiant was now under the momentum of the station itself, like a very heavy passenger on a merry-go-round. "Power down all non-essential systems. Commander, observe standard protocol."

"Yes Captain," Commander Greene said as he relayed her orders to the rest of the ship. Every department would shut down those systems that weren't needed while the Defiant underwent any repairs and refurbishments that had been scheduled for her.

"When the bridge is cleared, come and find me," Jessica told him.

The Commander nodded. Jessica ran her eyes over her team – Kyle Banks at the helm, Olivia Rayne at the comm. station, Lisa Chang at the science and tactical station, and Del Greene by her side as her second in command – and all she could feel was pride at having the fortune of serving with such a fine group of men and women.

"I'll be in my quarters," Jessica said as she left the bridge. "Well done everyone."

Click here to find Enigma on Amazon.com

**********
Huh. I thought the first chapter revealed a bit more than that. I suppose you'll just have to check out the book while you're waiting in those long lines at the mall.

By now, you all know Tony's bio. He's from England. So please, stop asking him to fire me because I don't catch his spelling errors. He writes in the Queen's English. They spell funny over there. ;)

Happy Reading!

Sunday, November 10, 2013

Oh Gosh, I Hate Peas

How many times have I uttered those words? I dislike peas so strongly that I will go to to great lengths to avoid having them even sit near my plate. To this day, the face I make when it's even suggested I may ingest a pea, is the same one any child makes when they encounter a food they don't like. It's there before I can stop it, like a nervous tic.

BUT, I will try anything once.

That's how I discovered that maybe these southern folk are on to something with this whole pea salad thing. Anyhow, I thought you would all like my take on this dish I didn't even know existed until about a month or two ago.

You see, my landlady invited me to join her and her family for a birthday party. As usual, I offered my assistance as soon as I arrived. She asked me to peel and chop the hard boiled eggs for the pea salad. I thought I heard her wrong, but I did as I was told. I peeled and chopped the eggs, then went back to her and asked what she wanted me to do with them.

She said, "just dump them in and stir it up, Darlin'. Everythin' else is already in there."

"Dump them in where?"

"That bowl right there next to you."

To my left, sat a medium-sized mixing bowl with this concoction of peas, onion, and mayonnaise that was simply waiting for me to dump in the eggs. So I dropped them in, gave it all a stir, and grabbed a spoon so I could have a taste. (I did tell you I'll try anything once, right?)

I fell so in love with this one that I demanded the recipe, then I proceeded to play with it in my own kitchen until I had a version I could call my own.

And to all you whole/raw food freaks out there: yes, I began with canned peas because Miss Debbie and her entire family use canned peas.

I like the Green Giant sweet peas for this one because they're sweet, firm, and fresh.
Use the best here, because most of your flavor is from the peas you choose.

*********
Almost Miss Debbie's Pea Salad

2 (15 oz.) cans of peas, drained and rinsed
1/2 red onion
2-3 strips of bacon, cooked until crispy then crumbled
3 hard cooked large eggs, peeled and chopped
2 T apple cider vinegar
1/2 c or so* plain Greek yogurt
1/8 t dill
salt and pepper to taste

Mix all ingredients in a bowl, cover, and chill
Serve cold

*This is that ingredient you eyeball, just like for any other salad of this type (macaroni, potato, tuna, egg, chicken, etc.).
**********
I still hate peas, just not as much as I used to.

Happy Cooking!

Sunday, November 3, 2013

What Do You Mean You've Never Had Eggplant!?

Those were the exact words that flew from my lips when my landlady's daughter told me she was looking forward to my latest culinary experiment. I mean, I realize we're in the southwest, but seriously. This is still America! You've got the Olive Garden!

Turns out, her mother had never tried eggplant either. Well, that sealed the deal. By golly, there would be eggplant lasagna in their collective future. Even if they hated it, I would ensure they would at least have the opportunity to try eggplant in the near future. After all, it was in season; it was on sale (crazy cheap, which means, as usual, I bought way too much); and I was craving it.

Now, for those of you in the know, eggplant lasagna is basically just a variation of eggplant parmigiana. And, if you've been following along, you'll recognize that the components of the recipe are pretty much the same as those for my spaghetti (squash) pie from a few weeks back. So here's a tip: make both the same week (or day even) and freeze one to have later. Better yet, double both recipes and freeze one of each.

A lot of good Italian cooking is simply variations on a few good themes. In this case, a sauce bolognese and a cheese mixture with eggs used as a binder. The major difference between this recipe and most other lasagnas of any type is that the eggplant is not just part of the show; it's the star. I'm leaving the noodles out because I really shouldn't be having the wheat.

Knowing that, make sure when shopping for your ingredients, you invest in the best you can afford. This is especially true, always, when purchasing things like olive oil. So here we go . . .
**********
Before you begin

Slice your eggplant lengthwise into 1/4" thick slices and lay it out on oiled and/or lined cookie sheets. Bake it for about 4-5 minutes on each side at 425 (f) and hold it aside.

There's really no need to season it because it's got such good flavor on its own and it's a substitution for noodles which tend to suck the flavor out of a dish.
**********
Noodle-Free Lasagna

1 lb. lean ground beef
1 medium onion, chopped
3 cloves garlic, minced
1 1/2 tsp. Italian seasoning
24 oz. tomato sauce*

1 large egg, lightly beaten
1 1/2 c. ricotta
1 c. grated or shredded parmesan, divided
10 oz. (about 2 1/2 c.) shredded mozzarella, divided
1/2 tsp. Italian seasoning
salt and pepper to taste

enough eggplant prepared as above to make 3 layers in your baking pan

Saute beef and onion until meat is just cooked through and onion becomes translucent.
Add garlic and Italian seasoning and cook about two minutes more.
Drain and return to pan.
Add sauce and bring to boil.
Lower heat and allow to simmer for about five minutes.
Remove from heat and set aside.

In a large mixing bowl, combine egg, ricotta, 1/2 c. parmesan, 8 oz. mozzarella, and seasonings.

Lightly oil a 9x12x2" or 9x13x2" baking dish with olive oil.
Pour a thin layer of sauce at the bottom of the pan.
Layer in eggplant**, then 1/2 of cheese mixture, then 1/3 of sauce.
Repeat.
Add a last layer of eggplant** and top with the last 1/3 of sauce.
Sprinkle top with reserved cheeses.
Bake in a 400 degree oven until heated through and top is golden brown, about 20-30 minutes (sauce will bubble, but test center).
Let stand about 10-15 minutes before serving.
**********
*You can use your favorite canned/jarred spaghetti sauce, plain tomato sauce, or your own secret family recipe. It's up to you. Remember, it's your kitchen.
**When you lay out your layers of eggplant, alternate the direction of the layers so it doesn't completely come apart when you slice into it.
**********
Variations

Use sliced or crumbled Italian sausage instead of ground meat.
Go vegetarian (but not vegan) by substituting mushrooms instead of meat.
If you prefer meatballs, saute them in the pan, then in the sauce, just as you would with the ground beef, but reserve them and serve them on the side.
Use zucchini or yellow squash, prepared the same way as the eggplant for a light, summer dish instead of a hearty, winter meal.
**********
When I double a recipe like this, I like to put it in those disposable plastic baking pans so I can just put one in the freezer. You can assemble it and freeze it, then take it out another time and throw it in the oven. It will take a full day (sometimes longer) in the fridge to defrost.

Happy Cooking!