"No matter how terrified you may be, own your fear and take that leap anyway because whether you land on your feet or on your butt, the journey is well worth it."
-- Laurie Laliberte
"If your dreams do not scare you, they are not big enough."
-- Ellen Johnson Sirleaf
"Life shrinks or expands in proportion to one's courage."
-- Anais Nin
Showing posts with label crochet. Show all posts

Sunday, August 23, 2015

So I Needed a Hand Towel for the Bathroom...

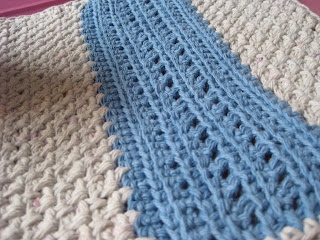
Seriously! That's how this design came to be. I needed one more pattern to round out the "Table and Tub" group from my Blog Collection and I toyed with several ideas: table runners, napkin rings, oven mitts . . . But nothing clicked for me. Then, one day, I found myself using a store-bought kitchen towel as a placemat. I was eating lunch at my desk and didn't want to get food on my laptop, so I draped the towel over it. After the lightbulb turned on over my head, I set to work and threw together a few notes and a quick sketch.

It's taken me about two years to get around to actually working and writing the pattern, but here it is. I finally knuckled down to make this because I realized we only had two hand towels for our bathroom. Of course, I love a pattern with some versatility, so I've included instructions for adding that cute little hanging loop you see on the corner. That's where the hand towel thing figures in. This little guy is just the right size to use for a placemat or as a hand towel. Besides, I like the way it looks in the bathroom hanging from that little loop.

Have fun with this one!

The Blog Collection
Placemat Pattern
by Laurie Laliberte Designs

A simple pattern to protect or accent your table top. Make a full set for yourself or to give as a hostess gift.

Finished Measurements:

approximately 12" x 16"

Supplies Needed:

size I-9 (5.5mm) crochet hook

about 2 oz. worsted weight yarn in Color A
about 1 oz. worsted weight yarn in Color B
smaller hook or yarn needle for weaving in ends

Samples were stitched using 100% cotton Sugar 'n Cream and/or Peaches & Creme worsted weight yarn.

All instructions use American Terminology.

Special Instructions:

BLO -- back loop only
FLO -- front loop only

Instructions:

Notes:  Each row is 39 sts across.

If you are working in two colors, change colors at the beginning of the Rows with the *.

ch 40

Row 1:  sc in 2nd ch from hook, [ch1, sk next ch, sc in next ch] across, turn

Row 2:  ch1 (does not count as 1st st here or in following rows), sc in 1st sc, sc in next ch1 sp, [ch1, sk next sc, sc in next ch1 sp]

Row 3:  ch1, sc in 1st sc, [ch1, sk next sc, sc in next ch1 sp] across, ending w/sc in last sc, turn

Rows 4-10:  repeat Rows 2-3 ending w/a Row 2

*Row 11:  ch1, sc in each sc and ch1 sp across, turn

Row 12:  ch1, sc in BLO of each st across, turn

Row 13:  ch1, sc in FLO of each st across, turn

Row 14:  ch1, sc in BLO of 1st st [dc in BLO of next st, sc in BLO of next st] across, turn

Row 15:  ch1, sc in FLO of 1st st [sc in FLO of next st, dc in FLO of next st] across ending w/sc in each of last 2 sts, turn

Row 16:  rep Row 14

Row 17:  rep Row 15

Row 18:  rep Row 14

Row 19:  ch1, sc in FLO of each st across, turn

Row 20:  ch1, sc in BLO of each st across, turn

Row 21:  rep Row 19

*Row 22:  ch1, sc in 1st st, [ch1, sk next st, sc in next st] across, turn

Row 23:  ch1, sc in 1st sc, [sc in next ch1 sp, ch1, sk next sc] across ending w/sc in each of last 2 sts, turn

Row 24:  ch1, sc in 1st sc, [ch1, sk next sc, sc in next ch1 sp] across ending w/sc in last sc, turn

Rows 25-57:  rep Rows 23-24 ending w/a Row 23


Finishing Round:

sc evenly around working 3sc in each corner
  
Optional Hanging Loop:

ch 10, sl st in 1st sc of Finishing Round, sl st in each ch back to beg, sl st to close loop at base

finish off, weave in ends
  
Designer's Note:

Any pattern I design is my intellectual property. Please do not duplicate any of my patterns for any reason especially to sell. Instead, please link to my blog or to the pattern page in one of my shops when referencing one of my patterns.

You are more than welcome to offer finished items made from my patterns for sale. In fact, I encourage it. However, I'd really appreciate it if you gave me credit for the design. Please reference my blog or the pattern page.


Happy Crocheting!

Saturday, July 25, 2015

I'm Posting a Day Early Because. . .

It's Christmas in July! that time of year when some of us are panicking because we only have five months left to make all those homemade gifts. Others are just beginning to make them and completely relaxed. So who will still be hooking away on Christmas Eve?

My advice? I tend to go by the KISS rule: Keep It Sweet and Simple. Along that vein, I leave you with a Christmas in July present for those oft forgotten fur babies. My roommate's kitten loves these things. So much so, that she keeps stealing my samples before I can photograph them.


Keep it Simple Cat Toy
by Laurie Laliberte Designs


This fun and simple project is a great pick-up gift to sell at craft bazaars or just to make for your favorite fur babies. I use a single plastic grocery bag to stuff the ball*, but a small amount of polyester stuffing works well too.

The design includes a reinforced chain with a finger loop at the end to make it an interactive toy, but many cats are just as happy to knock it around the house without any prompting from the people they own.


Finished Measurements:

ball, approximately 2" in diameter
string, approximately 12" long


Supplies Needed:

size G-6 (4.0mm) crochet hook
small amount of worsted weight yarn
small amount of polyfil or one plastic grocery bag for stuffing
small hook or yarn needle for weaving in ends

All instructions use American Terminology.


Instructions:

Round 1:  sc 6 in magic loop (6 sts)

Round 2:  2sc in each st around (12 sts)

Round 3:  [2sc in next st, sc in next st] around (18 sts)

Round 4:  [2sc in next st, sc in each of next 2 sts] around (24 sts)

Rounds 5-9:  sc around (24 sts)

Round 10:  [sc dec in next 2 sts, sc in each of next 2 sts] around (18 sts)

Note:  Now is the best time to stuff the ball, just be careful that you keep your stuffing inside as you close the ball.

Round 11:  [sc dec in next 2 sts, sc in next st] around (12 sts)

Round 12: [sc dec in next 2 sts] around (6 sts)

Continue sc dec until the top of the ball is closed OR close by stitching with a yarn needle.


Optional play string:  

chain 50, sl st in 10th st from chain and in each chain back to the top of the ball, end with sl st to top of ball, fo, weave in ends


*While this item is machine washable, if you choose to stuff it with a grocery bag, make sure you wash it in cold water and DO NOT tumble dry it.

Missy the Toy Thief keeps swiping my samples. I think I've made seven so far.


Merry Christmas in July!

Sunday, July 13, 2014

I See You! (free crochet pattern)

Yeah, yeah, yeah...I know it's been a while since I've treated you to a new, free pattern, but I plan to make up for it. The prototypes for the book are basically made. The rough drafts of all the patterns are written. All that's left is a bit of spit and polish, and a whole lot of high quality picture taking. Until then, you get to reap the benefits of a newly finished project:


The Blog Collection
Eyeglasses Case

Supplies:
small amount of Color A
small amount of Color B
size G (5.0 mm) crochet hook
smaller hook or yarn needle for weaving in ends

Note: All instructions are in American terms. This pattern is worked in the round which may make your beginning stitch travel (as when working amigurumi). Instructions are given at the best places to correct stitch position so that color changes are obscured. There is no need to join and ch1 at the end/beginning of each round.

ch 15 w/Color A

Round 1: sc in second ch from hook and each ch across, turn, sc in unused loop of each ch across (28 sts here and throughout)

Round 2: sc in each st around

Rounds 3-10: repeat Round 2

Lay your project flat. If your last stitch is not at the side of the pouch, add or remove stitches until it is. Change to Color B.

Round 11: sc in each st around

Round 12: sc in BLO of each st around

Round 13: rep Round 12

Round 14: [sc in BLO of next st, dc in BLO of next st] rep around

Round 15: [dc in BLO of next st, sc in BLO of next st] rep around

Note: Yes, at the end of Round 14/beginning of Round 15, you will work two dc side by side.

Round 16: [sc in BLO of next st, dc in BLO of next st] rep around

Note: Yes, at the end of Round 15/beginning of Round 16, you will work two sc side by side.

Round 17: rep Round 15

Round 18: rep Round 16

Round 19: sc in BLO of each st around

Rounds 20-21: rep Round 19

Lay your project flat. If your last stitch is not at the side of the pouch, add or remove stitches until it is. Change to Color A.

Round 22: sc in each st around

Rounds 23-24: sc in each st around

Stop here and slide your glasses into the pouch. You should have about ½" of space from the top of the glasses to the end of the case so your glasses don't easily slip out on their own. If not, continue to add rounds of sc until you do.

Lay your project flat. If your last stitch is not at the side of the pouch, add or remove stitches until it is.

Optional Hanging Loop: join w/sl st in next st, ch 10, join w/ sl st in same st, sl st in each ch back to first ch

Optional Button Closure: Find the middle front of your project and mark it for attaching your button. Find the corresponding stitch on the back of the project and mark it for the button loop.

sc in each st stopping at marked st on back of project, ch12, attach in same st w/sl st, sl st in each ch around loop, sc in next st and each st around

finish off, weave in ends

This pattern has been tested only by me. If you find a mistake, please leave it in the comments below and I will make the necessary corrections. If you need help, feel free to post any questions in the comments and I will get to them asap.

Any pattern I design and post here is my property. Please do not duplicate my patterns for any reason especially to sell. Instead, please link to my blog or to the pattern page when referencing one of my patterns.

You are more than welcome to offer finished items made from my patterns for sale. I see no reason why you should not profit from your hard work. However, I'd really appreciate it if you gave me credit for the design; please reference my blog or the pattern page.

If you do make any of my patterns, I'd love to see your finished items; please feel free to email pictures to me.

BigGirlJewelry@yahoo.com

Happy Crocheting!

Sunday, February 23, 2014

Call Me a Tease if You Must . . .

. . . just so long as you call me. ;)

Hey all! I've been sick, and working, and working, and sick. Right now, my priorities include projects with Tony Healey, Bernard Schaffer, Reeni Austin, and a newbie by the name of Tony DePaul. However, we all know I try to squeeze in some crochet time whenever I can because it maintains my sanity.

Of course, crochet for me is more than just pleasure; it's work. Rarely do I crochet only for the love of the craft. Chances are, if you see a hook in my hand, I'm working on a gift for a friend, an item for a craft show, or a sample for a new pattern.

Over last weekend, it was a sample called "Movie Night." I actually sketched out the design two or three years ago and then it sat, waiting for me to get back to it. The problem with the creative process, whether designing crafts, writing music, or writing prose or poetry, is that when it rains, it pours.

Once I get started, I can't stop. I sketched out about fifteen designs all at once and this one got lost in the shuffle, but it's always been in the back of my mind to finish it. I even bought the yarn for the sample way back when.

You see, the reason I named it "Movie Night" is that it was inspired by the red-and-white striped boxes that the old theatres used to serve popcorn. The basic design will be on a plane of white with red stripes in the form of post stitches and embellished with yellow popcorn stitches.

I've only reached the point where the pattern for the towel is worked out and written, but I'm pretty excited about it.

Meanwhile, the latest crochet book is well on its way to being finished. All of the samples are done except for one which needs pictures to be taken step-by-step for part of the pattern. And the clearer, more formal writing of the instructions and formatting need to be laid out.

So what else could I possibly have going on? Well, there's a serial I'm co-writing with Tony Healey that I hope we'll be able to reveal officially next month, and a couple of story ideas I'm developing with/for Reeni Austin that I hope we'll be able to publish within the next couple of months. That one's been slower going than I expected. Friends, a word of advice: writing is fairly easy, but writing romance is HARD!

Anyhow, I'll keep you posted, so stay tuned.

Namaste.

Monday, February 10, 2014

Single Shoulder Strap Pattern/Tutorial

Just in case you missed it, a couple of weeks ago, I posted the pattern for my Blog Collection Round Hobo Bag, possibly my favorite bag so far. Although that Windmill bag... Maybe I should just refrain from playing favorites.

Anyhow, because the straps of the bags in this collection are meant to be interchangeable, I chose not to post it all in one go. That, and I had yet to write up a coherent pattern.

Please be aware that the instructions for the strap are specific to the Round Hobo Bag, but a quick note about changing it up for other bags follows the pattern.

**********


Single Shoulder Strap

chain 120, do not turn, skip next 54 sts

Design Note:  For now, ignore those 54 skipped stitches, but you may want to mark the first and last skipped stitch so they're easier to find later.

Round 1:  being careful not to twist chain, connect to next st w/sc, sc in next 53 sts, sc in each ch across (174 sts)

Round 2:  sc in each of next 53 sts, skip next st, sc in each of next 119 sts, skip last st (172 sts)

Round 3:  skip 1st st, sc in next 51 sts, skip next 2 sts, sc in each of next 117 sts, skip last st (168 sts)

Round 4:  skip 1st st, sc in next 49 sts, skip next 2 sts, sc in next 115 sts, skip last st (164 sts)

Round 5:  skip 1st st, sk in next 47 sts, skip next 2 sts, sc in next 114 sts, join w/sl st in 1st st (161 sts)

finish off, weave in ends
(opposite side) Round 1:  connect w/sc at 1st skipped st, sc in next 53 sts, sc in each unused loop of ch (174 sts)
Rounds 2-5:  repeat Rounds 2-5 above

finish off, weave in all ends
**********
Modifying this strap to fit any bag is fairly simple. Instead of skipping 54 stitches, use the stitch count of the last row/round of your bag. Divide your total stitch count by two. This is the number of stitches you will skip.
In the coming months, as I post other bags from this series, I will also post the how-to's for their respective straps including a slightly narrower shoulder strap and a much shorter rolled handle. In the meantime, have fun playing with this one.
Happy Crocheting!

Sunday, January 26, 2014

Free Crochet Pattern and a Sneak Peek at the New Crochet Book

Hey y'all! I decided I needed a short (heh) vacation, but I'm back. More important, I'm back with post number 200 here on the blog.

In honor of this milestone, I've brought you a gift: a free pattern you're going to love. As promised, I'm continuing to drop patterns from my new, almost finished, crochet book. This one just may be my favorite of the bunch simply because I'm addicted to round hobo bags.

This week, you get just the basics, the body of the bag, but the recommended amount of yarn is for the whole thing. The shoulder strap pattern/tutorial is something I will share with you within the next couple of weeks.

As usual, I worked the sample in Lily Sugar 'n Cream yarn, but it will work with any worsted weight yarn. The colors here are Hot Pink and Hot Orange. Grab your hook and get to work!

The Blog Collection Hobo Bag

Finished Size:

body – 9" diameter x 11" high
strap – 32" long x 2 ½" wide

Supplies Needed:

3 balls of yarn for body
2 balls of yarn for contrast
size H-8 (5mm) crochet hook
stitch markers or pieces of scrap yarn
yarn needle or smaller crochet hook for weaving in ends

Instructions:

Round 1: using magic ring method, 12 sc in ring, pull ring tight to close gap (12 sc)

Round 2: 2sc in each st around (24 sc)

Round 3: sc in each st around (24 sc)

Round 4: [2sc in next st, sc in next st] around (36 sc)

Round 5: sc in each st around (36 sc)

Round 6: [2sc in next st, sc in next 2 sts] around (48 sc)

Round 7: sc in each st around (48 sc)

Round 8: [2sc in next st, sc in next 3 sts] around (60 sc)

Round 9: sc in each st around (60 sc)

Round 10: [2sc in next st, sc in next 4 sts] around (72 sc)

Round 11: sc in each sc around (72 sc)

Round 12: [2sc in next st, sc in next 5 sts] around (84 sc)

Round 13: sc in each st around (84 sc)

Round 14: [2sc in next st, sc in next 5 sts] around (96 sc)

Round 15: sc in each st around (96 sc)

Round 16: [2sc in next st, sc in next 5 sts] around (108 sc)

Round 17: sc in each st around (108 sc)

Round 18: in BLO sc around (108 sc)

Round 19: sc in each st around (108 sc)

Rounds 20-27: repeat Round 19

change colors*

Round 28: sc in each st around (108 sc)

Round 29: repeat Round 28

Round 30: in BLO sc around (108 sc)

Round 31: repeat Round 30

Round 32: in BLO [sc in next st, dc in next st] around (108 sts)

Round 33: in BLO [dc in next st, sc in next st] around (108 sts)

Round 34: repeat Round 32

Round 35: repeat Round 33

Round 36: repeat Round 32

Round 37: in BLO sc around (108 sc)

Round 38-39: repeat Round 37

Round 40: sc in each st around (108 sc)

change colors*

Rounds 41-55: sc in each st around (108 sc)

do not finish off*

Before you move on to the shoulder strap, make sure this length works for you. If you do follow my instructions for the strap, you'll be adding another five rows (about 1 1/4") to the top of the bag, so keep that in mind as well.

Happy Crocheting!

Sunday, September 15, 2013

How to Get a Free Hat Pattern, Volume 2

My younger nephew at age five
modeling the Astro Hat
I am very pleased to say that in the year since the original post, I've had quite a few requests for
patterns from my readers. It warms my cold, dead, tired heart. Heh.

So please, please, PLEASE, keep up the good works, and keep requesting those freebies. I will gladly continue to send out those free pdfs to any of you who request them. Now, for those of you who have no idea what in the world I'm talking about, keep reading . . .

Since my income doesn't allow for a whole lot of charitable contributions, and because I find most charities to be shams, I choose to contribute what I CAN give: crochet. Cancer patients, among others, can always benefit from hats/chemo caps, so I make all of my hat patterns available free to those of you who pledge to make at least two of the pattern as donations to the charities of your choice.

Before I get too far ahead of myself, let me first give you an updated list of, and links to, all of my hat patterns:

  1. Big Girl Hat #1*
  2. The Blog Collection Beanie*
  3. Simple Earth Hat
  4. Astro Hat

Okay, now a list of organizations I like to support or that have been suggested by my readers:
  • Dana Farber Cancer Institute because several friends of mine (survivors and those not so fortunate), who have had cancer, have spent quite a bit of time there
  • Boston Children's Hospital because one of my closest friends, who died of Cystic Fibrosis, called this his second home
  • Teal Hat Project (yes, your donation to them should be teal, their signature color) begun by an online pal a couple of years back, gathers hats to donate to ovarian cancer patients
  • Halos of Hope recommended by Jessica, one of my blog readers, last year

Now for more details and the official rules:
  • Place your request and your email address in the comments below this post and I will send your pattern via email within about 72 hours. (The best way to post your email is like this: biggirljewelry at yahoo dot com.) Some of the patterns will come from my biggirljewelry email, some from ravelry. It depends on where I have the file stored, so keep your eyes peeled.
  • For each hat pattern you request, you pledge to make two hats to give to the charity of your choice. You don't have to choose from my list; you may give them to whomever you want, like your local church or homeless shelter.
  • Just for clarification, if you request all four patterns, you pledge to make eight hats for charity. After you've fulfilled your obligation, go right ahead and make as many as you wish for family and friends or even to sell on Etsy or local craft fairs.
  • More clarification . . . this applies to my hat patterns only. Requests for other patterns will not be filled. The original purpose of this program was to encourage my readers to make chemo caps. I began it in memory of a friend of mine who lost her fight with leukemia last year.
  • I would love to see pictures of your finished projects. Please don't be shy about emailing them to me.
My older nephew, then age eight,
modeled the Simple Earth Hat

I plan to continue this program for as long as I have this blog. If I add any hat patterns to my collection, regardless of whether I have posted them in the list, I will include it.

*In the interest of full disclosure, know that each of these two patterns is also available here on the blog at no charge, but I don't sell the pdf versions. If you request it, I will send the pdf to you via email, but the same rules apply to these as my paid patterns.
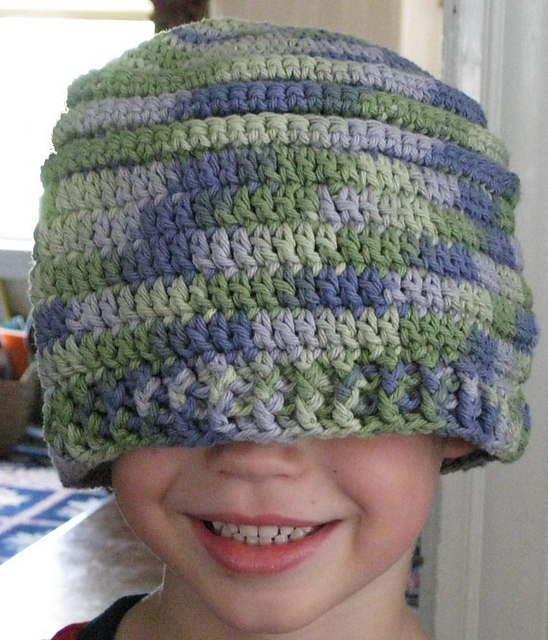
My niece reluctantly modeled The Blog Collection Beanie for me when she was three

Happy Crocheting!

To reiterate: You are pledging to make two hats for each pattern you request. Four hats are available as of 1/8/2013. If you request all four patterns, I would expect that you would make and donate eight hats, two of each pattern. Also, I specifically request that you do NOT email your requests to me. Leave a comment below in the comments section. Emailed requests are not likely to be answered as this is not my main email account.

Sunday, September 1, 2013

Free Pattern Blog Collection Tablet Sleeve Tutorial

Hey ya'll! I promised you a new free pattern this week and it's here. Unfortunately, I have yet to take really good pictures, so bear with me. The one I have on file will do for now. Anyhow, you're all more interested in the pattern than looking at pretty pictures, right? So let's get to it!

The Blog Collection

Sleeve for 10" Tablet

Note: The sleeve in the picture is for my Nexus 10 and began with a chain count of 25. Yarn used was Lily Sugar and Cream, 100% cotton 1 ball Hot Green and 2 balls Hot Orange.
This project is crocheted in continuous rounds. I don't join and ch1 at the end of each round, but you may if you choose. This method, like Amigurumi, can cause your first stitch to travel or twist. Notes are added throughout the pattern to tell you where to adjust for that twist.

Supplies:

worsted weight yarn of your choice (approx. 150 yds of main color and 70 yds of accent color)
size H-8 (5mm) crochet hook
stitch marker
yarn needle or smaller hook for weaving in ends
1" button

Work a beginning chain long enough to fit the width of your tablet. If you plan to line your finished project, add 4 or 5 more depending on how tightly you crochet. If you do not plan to line it, add 2 or 3 more to ensure you have enough wiggle room for inserting and removing your tablet.

Round 1: 3sc in 2nd ch from hook, sc in each chain across except for the last, 5sc in last ch turning toward back, sc in remaining loops of each ch across except for the last (the one with 3sc already), 2sc in last ch

Round 2: sc in each st around

Round 3-19: repeat Round 2

Round 20: repeat Round 2, change colors

Note: Before you change colors, check that your last stitch is on the end of your project. If not, work a few more sc so your color change will be on the edge, so it's less obvious. This is also a good spot to fit your sleeve to your tablet and ensure you have enough play to slide the tablet in and out of the sleeve.

Round 21: sc in each st around

Round 22: repeat Round 21

Round 23: sc in back loop only of each st around

Round 24: repeat Round 23

Round 25: [sc in back loop only of next stitch, dc in back loop only of next stitch] around

Round 26: [dc in back loop only of next stitch, sc in back loop only of next stitch] around

Note: Yes, because you have an even number of stitches, you will have two of the same stitch next to each other as you transition between rounds here. I've found that this section works pretty straight, so you really shouldn't see this in your finished project.

Round 27: repeat Round 25

Round 28: repeat Round 26

Round 29: repeat Round 25

Round 30: sc in back loop only of each st around

Rounds 31-32: repeat Round 30

Round 33: sc in each st around, change colors

Note: Before you change colors, check that your last stitch is on the end of your project. If not, work a few more sc so your color change will be on the edge, so it's less obvious.

Round 34: sc in each st around

Rounds 35-end: repeat Round 34 until your sleeve is long enough to cover your tablet and have two extra rows for complete coverage

Final Round/Finishing: Find the middle front of your project and mark it for attaching your button. Find the corresponding stitch on the back of the project and mark it for the button loop.

sc in each st stopping at marked st on back of project, ch12, attach in same st w/sl st, sl st in each ch around loop, sc in next st and each st around

Note: Before you finish off, check for the twist in your project. If necessary, continue to work sc around until you reach the edge. Join with a sl st in next st and finish off.

**********

This pattern/tutorial is offered at no cost, but will be available to purchase as a part of my next crochet book. It has yet to be fully tested, so I welcome all comments and questions. Please do not email them to me; instead leave them in the comments section below so that others may benefit from the answers.

As always, you are welcome to make as many as you wish to sell in your Etsy shops or at craft sales, etc. I ask only that you give me credit for the design and do not re-post or print and sell the original pattern. Instead, link to the pattern when referring to it.

Happy Crocheting!

Sunday, July 21, 2013

What's Cookin'?

The short answer to that one is, "Nothin'."

When I moved in here, the kitchen was dirty, dark, and difficult to work in. Now it's bright, airy and impossible to work in. My landlady has absolutely no concept of what makes a kitchen workable. She insisted on beginning a kitchen renovation she knew she would have to stop in the middle. Therefore, I currently have zero counter space.

When I say zero, I'm not exaggerating; all of my counters are gone, along with nearly all of my cabinets. My toaster and coffee maker are currently sitting on top of the stove. I've eaten little beyond raw foods for weeks.

But I'm not here to whine. In fact, it's just as well that I have no space in which I can experiment with new recipes because I've been working my tail off to help churn out several new books. So lets take a quick peek at what's new and on its way to tickle your Kindle, shall we?

Currently Available:

Far From Home 8: Warrior -- The eighth installment of Tony Healey's Far From Home serial takes us to the two thirds mark with some unexpected discoveries. It's definitely a piece you won't want to miss.

More Than a Maid -- The last, and longest, installment of the Barboza Brothers trilogy by Reeni Austin answers all the questions thousands of readers have been asking, but don't think we're done with this family yet.

Coming Soon:

The Girl from Tenerife -- A beautiful story about love, passion, and friendship as well as a haunting tribute and a challenge to the older generation of writers who influenced the author and his love of the craft. THIS is Bernard Schaffer's best work to date.

The Manifesto of Independent Writing and Publishing -- The second book by author Bernard Schaffer being released on the Dia de los Toros. This one is a manual meant to help the next generation of independent authors avoid the pitfalls that held Schaffer up as a newbie. If you're thinking of self-publishing, you need this book.

Both of those titles, plus a super-secret (that just means he hasn't shown off the cover or announced the title yet) children's book Bernard has written for his daughter, will be released on the same day.

PLUS, I'm finishing the final edit on a fan fiction piece by Joshua Unruh that may or may not be found in a larger anthology (that's still undecided), but it will be everywhere soon. Josh is also plotting a sequel to Downfall, the five-star debut in his Myth Reaver series.

Still in Development:

Here's the part where I get to be a bit sneaky and maybe show off a little . . .

From Reeni Austin -- More steamy deliciousness involving some peripheral characters from the Barboza Brothers series.

From Shaina Richmond -- More from the world of Tyler and Suzie.

From Tony Healey -- The final four installments of the Far From Home series and about ten other projects guaranteed to keep me busy for the next year.

From Bernard Schaffer -- Hellifino. He doesn't tell me anything because he enjoys teasing me as much as his readers.

And That's Not All:

I'm still in the midst of editing novels by newcomers Michael Tognetti and M. L. Adams. I've also been in contact with several authors who are looking to line me up for their second in series. And maybe one or two completely new projects coming out of the ether.

I will also be finishing my latest crochet project book and beta reading a couple of pieces for my dear friend Joshua Unruh, but without his permission, I don't even want to tease you with any details.

Yep, I'm already looking at 2014 and thinking, "How am I going to get this all done?" But then I look back and see what I've finished so far this year and I think. "I got this."

Happy Reading!


Sunday, June 30, 2013

Merry Handmade Christmas!

Basket Case Kitchen Set
I think we're all familiar with the crazy practice of Christmas in July, but it's not so crazy when you consider that you have about five months to decide upon, and make, all those handmade gifts for the holidays. I love giving handmade gifts whenever I can. I also love receiving them. Partially because they can be economical, partially because it makes me feel good to know how much love and attention goes into handmade products. They don't simply roll off an assembly line, mass produced in a factory where thousands, even millions, of the same design are spit out by machines.

The only part of gifting that makes me happier than bestowing a handmade present is returning to find that gift tattered and torn and used and abused. Why? Because that use and abuse tells me that the item was truly cherished, truly loved. I'd rather return to find an afghan falling apart than one in pristine condition as though it's been hiding in a drawer except when the recipient pulls it out because they know I'll be visiting.

A person who truly cherishes a handmade object (and the person who made it) understands that it won't last forever, and that the maker filled it with love, and that the best way to acknowledge that love is to use the item.

My mother, about thirty years ago, went through this crazy afghan-crocheting binge. I took several of those blankets with me, including one she made specifically for me, when I moved into my own apartment. I still have one of them. I will confess that it's currently packed safely in a box on the floor of my closet waiting for the day when I again have a larger apartment where I can proudly display that afghan (and use it daily). That blanket is one of my prized possessions, which is saying quite a lot when you consider I've become something of a minimalist.

On the opposite side, I have a friend for whom I made a beautiful baby afghan to celebrate the birth of her first child. I searched my personal library for just the right pattern and decided I wanted to cross-stitch an adorable Pooh design to match his room. I stood in the store, pattern in hand and picked out just the right fabric and scoured the rack for the correct colors of embroidery floss. Then I spent evenings and days off, whenever I could find a few spare moments, bringing the design to life. I washed it by hand, allowed it to air dry, and pressed it carefully so it would be pristine and ready for use by the first child brought into the world whom I would be honored to call not "my friend's kid," but "my nephew."

The "baby" is about to celebrate his eleventh birthday. The blanket already has. You see, that cross-stitched afghan has spent nearly all of its eleven years in a drawer. Hours of painstaking work, hundreds, maybe thousands, of stitches, and it has hardly seen any use. That breaks my heart. I begged my friend to donate it to Project Linus or to Children's Hospital so at least a child who needed it could use it. But she refused. Why? Because she didn't want it to get ruined.

If I had known it would never get used, I would have purchased a blanket for half what it cost me to make that one and the store-bought one would have been put to use. Fifteen bucks, fifteen minutes, done.

So why have I shared these stories with you? Because I hope to remind you to choose wisely if you're making some gifts and buying others this year. And if you receive any handmade gifts this year, I hope to help you understand that a handmade gift belongs in your hands where it will be used, not in a drawer where it won't.

The Whole Shebang Value Bundle (pot holders)

Anyhow, let's get to the point. It's time to decide what to make and what materials to buy. And I'd like to help if I can. My Whole Shebang Value Bundle is already a great deal at $24.99 for 18 patterns; that's six different kitchen sets. But I'm sweetening that deal for the month of July*. Use this link which will take you to my Ravelry store and automatically drop the deal into your basket. What's the deal? When you purchase the Whole Shebang, you will also receive my Basket Case Value Bundle, normally priced at $5.49, as my Christmas in July gift to you.

If you prefer, you may drop the two bundles into your basket separately and the highly intelligent Ravelry computer will do the rest. Unfortunately, there is no way for me to offer exactly the same deal automatically via Etsy, so I will do it manually in the back of the house. (That's retailspeak for, "I'll take care of it for you; don't worry.")

*Offer expires July 31, 2013 at 11:59 p.m. GMT.

Merry Christmas!