"No matter how terrified you may be, own your fear and take that leap anyway because whether you land on your feet or on your butt, the journey is well worth it."
-- Laurie Laliberte
"If your dreams do not scare you, they are not big enough."
-- Ellen Johnson Sirleaf
"Life shrinks or expands in proportion to one's courage."
-- Anais Nin
Showing posts with label tutorial. Show all posts

Sunday, September 1, 2013

Free Pattern Blog Collection Tablet Sleeve Tutorial

Hey ya'll! I promised you a new free pattern this week and it's here. Unfortunately, I have yet to take really good pictures, so bear with me. The one I have on file will do for now. Anyhow, you're all more interested in the pattern than looking at pretty pictures, right? So let's get to it!

The Blog Collection

Sleeve for 10" Tablet

Note: The sleeve in the picture is for my Nexus 10 and began with a chain count of 25. Yarn used was Lily Sugar and Cream, 100% cotton 1 ball Hot Green and 2 balls Hot Orange.
This project is crocheted in continuous rounds. I don't join and ch1 at the end of each round, but you may if you choose. This method, like Amigurumi, can cause your first stitch to travel or twist. Notes are added throughout the pattern to tell you where to adjust for that twist.

Supplies:

worsted weight yarn of your choice (approx. 150 yds of main color and 70 yds of accent color)
size H-8 (5mm) crochet hook
stitch marker
yarn needle or smaller hook for weaving in ends
1" button

Work a beginning chain long enough to fit the width of your tablet. If you plan to line your finished project, add 4 or 5 more depending on how tightly you crochet. If you do not plan to line it, add 2 or 3 more to ensure you have enough wiggle room for inserting and removing your tablet.

Round 1: 3sc in 2nd ch from hook, sc in each chain across except for the last, 5sc in last ch turning toward back, sc in remaining loops of each ch across except for the last (the one with 3sc already), 2sc in last ch

Round 2: sc in each st around

Round 3-19: repeat Round 2

Round 20: repeat Round 2, change colors

Note: Before you change colors, check that your last stitch is on the end of your project. If not, work a few more sc so your color change will be on the edge, so it's less obvious. This is also a good spot to fit your sleeve to your tablet and ensure you have enough play to slide the tablet in and out of the sleeve.

Round 21: sc in each st around

Round 22: repeat Round 21

Round 23: sc in back loop only of each st around

Round 24: repeat Round 23

Round 25: [sc in back loop only of next stitch, dc in back loop only of next stitch] around

Round 26: [dc in back loop only of next stitch, sc in back loop only of next stitch] around

Note: Yes, because you have an even number of stitches, you will have two of the same stitch next to each other as you transition between rounds here. I've found that this section works pretty straight, so you really shouldn't see this in your finished project.

Round 27: repeat Round 25

Round 28: repeat Round 26

Round 29: repeat Round 25

Round 30: sc in back loop only of each st around

Rounds 31-32: repeat Round 30

Round 33: sc in each st around, change colors

Note: Before you change colors, check that your last stitch is on the end of your project. If not, work a few more sc so your color change will be on the edge, so it's less obvious.

Round 34: sc in each st around

Rounds 35-end: repeat Round 34 until your sleeve is long enough to cover your tablet and have two extra rows for complete coverage

Final Round/Finishing: Find the middle front of your project and mark it for attaching your button. Find the corresponding stitch on the back of the project and mark it for the button loop.

sc in each st stopping at marked st on back of project, ch12, attach in same st w/sl st, sl st in each ch around loop, sc in next st and each st around

Note: Before you finish off, check for the twist in your project. If necessary, continue to work sc around until you reach the edge. Join with a sl st in next st and finish off.

**********

This pattern/tutorial is offered at no cost, but will be available to purchase as a part of my next crochet book. It has yet to be fully tested, so I welcome all comments and questions. Please do not email them to me; instead leave them in the comments section below so that others may benefit from the answers.

As always, you are welcome to make as many as you wish to sell in your Etsy shops or at craft sales, etc. I ask only that you give me credit for the design and do not re-post or print and sell the original pattern. Instead, link to the pattern when referring to it.

Happy Crocheting!

Sunday, June 2, 2013

Lining and Cheating

Hey y'all! Perhaps one day I will blog about this week's adventures and tell you how much fun it isn't to have a mile-wide tornado headed straight for your neighborhood, but not today.

I won't have time to offer you a proper blog post, so instead I will round out the Windmill Bag series with a link to a fabulous tutorial I found for making a lining for your bag. I plan to use this one myself if I can find just the right fabric. (Call THAT a great excuse to visit my favorite Wal-Mart on the other side of town.*)

I can't tell you how deeply I've fallen in love with this bag. My version, the original that inspired it, and all the many incarnations shown in the project pages on Ravelry. (Confession: sometimes I visit the project page of that one just to ogle the various ideas Ravelers have come up with.)

I guarantee, if you are a Handbag Queen, like I am, you will be making more than one whether it's mine, or a version of the original, or a concoction of your own.

So, here's that link and a sneak peek (check out the pic below) at what you might see when I release this series in the Kindle store!

Fun right? The yarn is Lily Peaches and Cream in Hot Blue and Hot Pink.

*Oklahoma City is such a huge land mass (according to the 2010 census, OKC covers 606.41 square miles) that there are at least ten Wal-Mart locations inside the city limits.

Happy Crocheting!

Sunday, May 19, 2013

Get It Together (free tutorial for assembling the Blog Collection Windmill Bag)

Okay, last week you got the pattern for the panels of the Windmill Bag based on my signature, Blog Collection, motif. This week, I'm going to show you how I assembled the bag. There are many, less complicated, ways of putting the pieces together, but I use this one because it only requires two seams. (We have already established that I hate to sew, right?)

If you're a newbie, I'd recommend trying a simpler assembly method first. You'll find numerous tutorials on various blogs and on Youtube.

Lay all four of your pieces out so they are set the same way. The bottom is your beginning chain; the top is Row 17.

On the bottom, place a marker at the 17th stitch from the left (mine is green). On the top, place a different colored marker at the 18th stitch from the right (mine is blue).


Lay your pieces out end-to-side as shown so they resemble a windmill. Attach them using your stitch markers. Each row at either end will require one stitch, hence the count of 17.


At the center (which will be your bottom), hold all 4 together with one marker.


Fold up your opposite ends and attach them to one another using the stitch markers so they resemble the picture that shows the assembled piece. The corner of one panel will meet the blue marker of the next panel. This will give you the zig-zag effect at the top. You may want to pin the sides or use additional stitch markers to hold them together as you might if you were sewing a fabric bag.


At this point, you should be able to visualize a finished sack.

Hold the bag inside out with right sides (outside) facing. *Attach your yarn with a slip stitch at the open end (top) of the bag through two layers and slip stitch the pieces together.

Continue stitching through the center where all four pieces join and end at the opposite side, on the top of the bag.

Repeat from the * for the remaining seam.

Note: Assuming the seams would go through quite a bit of strain, I chose to crochet through all 4 loops to give the bag more strength.

You should now have a sack that resembles the one pictured except for the border and shoulder straps.

I will publish the pattern/tutorial for the border and straps next week.

Happy Crocheting!

Sunday, May 20, 2012

Put down Your Book and Pick up Your Hook

Haven't we had enough of reading around here for a little while? I think it's time to get our crochet on and I've found the perfect way to do it. A while back, Samantha emailed me and told me about these great towels she makes using a portion of my Big Girl Towel pattern. I can't remember how it all went down, but we basically decided that she should write up a tutorial that we could each post on our blogs. I think you'll agree with me that the towel and the yarn colors she used for her example are awesome. (I love pink.) Anyhow, please welcome Samantha and her rockin' kitchen  towels.

Hi Everyone!!
I have been asked a few times how I make my Kitchen Towel Toppers:
The crocheted top I use is fashioned after top of Laurie’s hanging kitchen towel patterns (I have most of them), so I asked her if she minded if I created a tutorial and I use her pattern for reference.  Her idea was for me to do this guest post and I happily agreed.
I have made these using worsted weight yarn and dk weight yarn.  I think you could easily adapt it for other weights as well.


Materials needed to start:


·         Yarn
·         Scissors
·         Towel
·         Needle (I use a tapestry needle, but that means I need a thimble to push it through sometimes)
First thing you need to do is cut the towel in half.  You really only need one half of the towel and on the plus side you get more for your money!


I don’t really worry about this being perfectly straight because in the end it is going to be somewhat gathered.
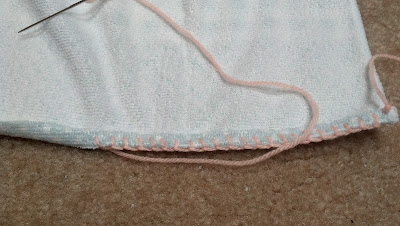
After the cut is made, thread your needle with a long piece of yarn.  I now make mine really long because one time I made it too short and had to redo it and that was not fun.


Next you want to fold down the top of the towel like so:


Folding the towel down like this makes it so you don’t have any raw edge exposed.
Next we want to put the needle through so that the knot is on the edge in the back.


Then we want to start doing the blanket stitch (youtubetutorial found here) across the top of the towel.  Make sure to continue to fold the very top down so the cut edge is not exposed.  You can pin this edge if you want to make it easier for you.


Here’s how mine looks from the back with the top folded down.


Once you have gone all the way across make sure you knot it in the back.


We are going to put one sc in each blanket stitch, so make sure to keep the stitches fairly close together.  Although the thicker the yarn you use the farther apart the stitches can be.  I am using dk yarn in this example.
Now you can start doing sc across the blanket stitch.  I use a larger hook than recommended for the yarn with these, but it is all what you are comfortable with.


Now once you get to the end just chain one and do a few more sc rows.  For worsted weight I tend to do 4 rows, but for this example in dk I did 5 rows.


If it starts to pull in a little that is okay.  We are going to start gathering it and decreasing anyway.
This is where I start to use Laurie’s pattern (Free Big Girl Kitchen Towel).  We want to sc dec
(A sc dec is insert hook into both loops of first stitch being worked, yo, pull up a loop, insert hook into both loops of next stitch, yo, pull up a loop, yo, draw through all 3 loops on hook)
over the next few rows to get down to 6 stitches.  Now this all depends on how many stitches you have.  In this example I have 54 stitches. 
So first row I just do sc dec all the way across and I end up with 27 stitches.


Next I sc dec 7 times, 1 sc, sc dec 6 times to get to 14 stitches.


Then I did sc dec 2 twice, dec over 3 stitches twice, then sc dec twice to get down to 6 stitches.
(dec over 3 stitches is insert hook into both loops of first stitch being worked, yo, pull up a loop, insert hook into both loops of next stitch, yo, pull up a loop, insert hook into both loops of next stitch, yo, pull up a loop, yo, draw through all 4 loops on hook)


Once down to 6 stitches, chain one and sc across.


Continue making the 6 stitch rows


I did about 20 rows.
Next, once it is long enough you will do the row that will become your button hole. 
From Laurie’s pattern:
Note:  Before proceeding, you may wish to fit your hanging loop to the place where you'd like it to hang.  If worked as instructed it will fit the average drawer pull or oven door handle.  If you need to add length simply continue repeating Row 64 as necessary.
Row 82:  ch3 (counts as dc), trc in next st, dtrc in next 2 sts, trc in next st, dc in next st, turn (6 sts)
Note:  The space between the two dtrc is your buttonhole.

Next you want to chain one and sc in the first two sts, two sc in each of the next two sts, and then sc in the last two sts, do not bind off.


Next, you want to sc down the side and stop right where you started the decreases.


Fasten off, then start on the other side where the decreases started.


Fasten off and weave in ends.


Sew on a button of your choice.


Sam, I can't thank you enough for dropping in to do this. I LOVE this idea and am going to have to make a couple for a friend this week.

By the way, folks, you can find Samantha's blog HERE.

Happy Crocheting!

Sunday, October 23, 2011

Curvy Knits

The Barton Cardigan is not included as part of the course, but it is shown as an example

A few weeks ago I told you about a great online course available from Craftsy called Curvy Crochet by Marly Bird. This week I'd like to tell you about it's close cousin, Curvy Knits.

I still consider myself a beginner when it comes to knitting. However, I'm confident enough in my ability that I'm willing to try just about any stitch pattern. I picked out a sweater pattern and bought the yarn for it months ago, but I've been a bit gunshy about starting the project.  Thanks to watching Curvy Knits, I'm feeling much more confident about trying the pattern. NOW I have to find the time.

The best thing about this class is the energy. Marly and the music in the intro are both upbeat, but not obnoxiously so. And the outtakes shown at the end of each class add to the fun. Marly has a genuine honesty as an instructor. She's not afraid to discuss figure problems/issues that we, as full-figured women have.  And she does it in plain English. She doesn't sugar-coat anything in the interest of modesty; she tells it like it is.  She speaks to the camera/student as she might speak to a trusted friend. It's easy to trust her and to enjoy her company as you watch her videos.

How about the technical? Marly keeps the math as simple as possible, but if you miss anything, you can back it up and watch it again. You can also take notes, bookmark wherever you want, and ask questions. I talked about this when I reviewed Curvy Crochet but it's well worth mentioning again:  the Duck Tape dress form is BRILLIANT and worth the price of admission.  It most certainly beats paying a fortune for a professional form and you're making an exact copy of YOU! The course materials are clear and as simple as they can be and can be printed over and over again.

This series is so chock full of great information I couldn't possibly touch on all of it, but I can definitely recommend it in good conscience.

Here's the best part:  By following this link, you can get Curvy Knits at a discount! It normally sells for $49.99, but you can enroll for $29.99 and never have to pay to see it again. Yes, just like buying a DVD, you own it forever.

Happy knitting!