"No matter how terrified you may be, own your fear and take that leap anyway because whether you land on your feet or on your butt, the journey is well worth it."
-- Laurie Laliberte
"If your dreams do not scare you, they are not big enough."
-- Ellen Johnson Sirleaf
"Life shrinks or expands in proportion to one's courage."
-- Anais Nin
Showing posts with label easy. Show all posts

Sunday, July 20, 2014

A New Way for Kids to Eat Their Vegetables

This one is specifically aimed at the parents out there who have a difficult time convincing their littles to consume anything green. A friend of mine made this recipe for me last night and I scolded her for not making more. It's ridiculously easy and I can almost guarantee it will get your kids (and my BFF) to eat their green beans.

It's also a great dish to make when you're busy in the kitchen, maybe preparing chicken fried steak and mashed potatoes. Let's face it, you can only tend to so many pans at once. This one doesn't need tending. In fact, the less attention it gets, the better. If you stir it too often, your beans will fall apart completely and you'll end up with very tasty mush. The only reason you stir it is to get it to caramelize somewhat evenly.

This concoction is very much a southern dish. It's fried in a skillet and utilizes bacon grease, so it may not be an every week staple as is. My brain is already hacking at this recipe to make it more healthy and keeping it kid friendly, so I bet I'll have an alternative that you can serve guilt-free on a regular basis.

Meanwhile, however much you think you need when you make it . . . double that. We had five cans of beans collecting dust in the pantry, but didn't want to use them all up at once. Normally, three cans should be enough for six people, but we all wanted seconds and there was none to be had.

For now, however, I will stick to the recipe as it was given to me. Sorry, y'all! The beans didn't last long enough to take pictures.


Skillet Green Beans

4 slices (about 1/4 lb.) bacon, cut into 1/2 inch pieces
1/4 to 1/2 medium-sized onion, chopped
3 (14.5 oz) cans cut green beans, drained
4 T butter
up to 1/4 c sugar
salt and pepper to taste

Brown bacon and onions in a large, nonstick skillet over medium heat then remove
Remove all but 1 Tbsp of the grease if you find it excessive (or leave it in, it's up to you)
Add beans
Drop butter on top and allow it to melt on its own
Stir occasionally, and gently, with a wooden spoon, while you tend to other things
When you're almost ready to take it off the stove, return bacon and onions to the pan, then add sugar, salt, and pepper, and stir to combine
Give it another few minutes to let the sugar caramelize

Do not panic if the edges of your beans or onions get dark; they should. However, if at any time, you fear they're getting away from you, or cooking too fast, reduce the heat. It's ready when everything else is. Just remove it from the stove, and serve.

This recipe is also budget friendly because canned green beans are often on sale. My local mom and pop grocery store has at least one brand on sale every week. That's probably why they ended up in my pantry. (I've never been a big fan of canned veggies.)

If onions are a deal breaker for your kids, then leave them out or use onion powder instead. That will give you that sweet, oniony flavor and the kids won't see it.

Rest assured, I will be playing with this in the near future and figuring out a way to make it a bit more healthy without skimping on the flavor. We could probably start by switching out the sugar for honey or agave nectar. In fact, I bet honey would taste even better than the yumminess I tasted last night.

Happy Cooking!

Sunday, October 13, 2013

WHAT Kind of Pie?

Say the words, "spaghetti pie" in Greater Boston, especially the North Suburban area, and people will grab their forks and follow you like zombies. But utter those same words here in the Southwest and you're met with blank stares. Your friends might begin planning an intervention, thinking you've lost your mind, and the neighbors will lock their doors and close their curtains if they see you walking up their driveways.

But spaghetti pie is one of my favorite dishes and my BBF (Best Boston Friend) was the one who taught me how to make it. Hers was the best!

These days, as I avoid pasta and keep gluten in my diet to a minimum, I find myself missing this favorite like you can't believe. So last week, when spaghetti squash was on sale, I snagged a couple and decided to experiment.

The verdict? I believe "no leftovers" pretty much sums it up.

**********
Start by slicing your spaghetti squash in half, lengthwise. Scrape out the seeds and loose pulp and set aside if you want to roast the seeds later. Lay the squash cut side down on a lined baking sheet. Roast it in a 375 degree (f) oven for about 30 to 40 minutes. Err on the side of it being underdone rather than fully cooked. Allow it to cool for a bit until you can handle it, then scrape out the guts with a fork. (Resist the temptation to eat the squash right out of the shell -- it's yummy!)

If that's not enough instruction for you, there are video tutorials all over youtube to teach you how to get the spaghetti out of spaghetti squash. You can also do it in the microwave, but I prefer the oven. It develops the flavor better.

Now you can use the "spaghetti" as the base for whatever recipe you choose. For this recipe, let it sit in a strainer for a few minutes to get rid of the excess moisture.

**********
Not Quite Spaghetti Pie

1 lb lean ground beef
1 med onion, chopped
1/2 t oregano
1/2 t basil
1/4 t sage (crushed or rubbed, not ground*)
1/2 t garlic powder
salt to taste
24 oz tomato sauce

2 large eggs, lightly beaten
1 c ricotta cheese
1/2 c grated or shredded parmesan cheese (or romano, or asiago, or a blend of the three)
2 c shredded mozzarella cheese, divided in half
1/2 t Italian seasoning
salt and pepper to taste

1 (3-4 lb) spaghetti squash, prepared as above

Brown meat and onions in a large frypan until meat is cooked through
Drain and return to pan
Add herbs and salt and allow to heat until you can smell the herbs
Pour in tomato sauce and bring to boil
Reduce heat and simmer for about five to ten minutes

Combine second group of ingredients in a large bowl, holding aside a cup of mozzarella
Fold in "spaghetti" until it's coated somewhat evenly
Lightly grease a 9x12" or 9x13" baking dish with olive oil
Spread spaghetti squash mixture evenly on bottom of pan
Add meat and sauce
Top with remaining cup of mozzarella

Bake in a 375 oven for about 25 minutes, until cheese is melted and sauce is bubbly
Allow to stand for about ten minutes before serving

*I have nothing against ground sage, but it's more potent than the rubbed sage I usually use, so cut the amount at least by half.

**********
I would say this serves eight, but everyone will come back for seconds, so if there's any question, double the recipe. Doubling works in a giant lasagna pan, but the heating time at the end will take longer. You'll also want to cover it so your cheese doesn't get too browned on top.

Generally, when I double a recipe like this, I prepare it in two of those disposable Gladware storage/bakeware containers so I can just stick one in the freezer. You can freeze it before you heat it in the oven, then just remove it from the freezer and heat it at 375 until it's hot, but that will take at least an hour and you want to cover it with aluminum foil so your cheese doesn't burn.

What to do with the leftovers? What leftovers?

Happy Cooking!

Sunday, October 28, 2012

Not Quite Top Chef

My BFF will be the first to tell you she's not the best cook in the world, but it's not because she's incapable. She's just not one of those people who can open the door to the pantry, grab a few items, and throw together a whole new creation.

What she IS good at, however, is finding quick and easy recipes that taste amazing. So I thought I'd share with you the latest. My personal goal (one of these days) is to remake this one from scratch so I have complete control over ingredients. Meanwhile, I'll make it once in a while with the gluten-free pre-breaded goodies from Perdue.

I could gladly eat chicken tenders for every meal.
Give me a side of onion rings and I'm a happy camper.
*Mom's Breaded Barbecue Chicken

1 package pre-breaded chicken of your choice
bottled barbecue sauce of your choice

Lay chicken pieces out on ungreased baking sheet.
Sparingly drop barbecue sauce on chicken. (The goal here is not to douse the chicken in the sauce but to add some flavor by getting the breading to absorb the sauce.)
Flip.
Repeat on other side.
Bake according to package directions.

I'm not kidding. It's really that simple. And how does it taste? Would I share a recipe with you I didn't love? This is definitely one of those dishes to throw together when there's literally zero time to cook.

Happy Cooking!

*I call my BFF "Mom" online to protect her anonymity.

Sunday, May 20, 2012

Put down Your Book and Pick up Your Hook

Haven't we had enough of reading around here for a little while? I think it's time to get our crochet on and I've found the perfect way to do it. A while back, Samantha emailed me and told me about these great towels she makes using a portion of my Big Girl Towel pattern. I can't remember how it all went down, but we basically decided that she should write up a tutorial that we could each post on our blogs. I think you'll agree with me that the towel and the yarn colors she used for her example are awesome. (I love pink.) Anyhow, please welcome Samantha and her rockin' kitchen  towels.

Hi Everyone!!
I have been asked a few times how I make my Kitchen Towel Toppers:
The crocheted top I use is fashioned after top of Laurie’s hanging kitchen towel patterns (I have most of them), so I asked her if she minded if I created a tutorial and I use her pattern for reference.  Her idea was for me to do this guest post and I happily agreed.
I have made these using worsted weight yarn and dk weight yarn.  I think you could easily adapt it for other weights as well.


Materials needed to start:


·         Yarn
·         Scissors
·         Towel
·         Needle (I use a tapestry needle, but that means I need a thimble to push it through sometimes)
First thing you need to do is cut the towel in half.  You really only need one half of the towel and on the plus side you get more for your money!


I don’t really worry about this being perfectly straight because in the end it is going to be somewhat gathered.
After the cut is made, thread your needle with a long piece of yarn.  I now make mine really long because one time I made it too short and had to redo it and that was not fun.


Next you want to fold down the top of the towel like so:


Folding the towel down like this makes it so you don’t have any raw edge exposed.
Next we want to put the needle through so that the knot is on the edge in the back.


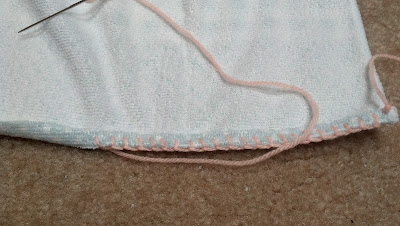
Then we want to start doing the blanket stitch (youtubetutorial found here) across the top of the towel.  Make sure to continue to fold the very top down so the cut edge is not exposed.  You can pin this edge if you want to make it easier for you.


Here’s how mine looks from the back with the top folded down.


Once you have gone all the way across make sure you knot it in the back.


We are going to put one sc in each blanket stitch, so make sure to keep the stitches fairly close together.  Although the thicker the yarn you use the farther apart the stitches can be.  I am using dk yarn in this example.
Now you can start doing sc across the blanket stitch.  I use a larger hook than recommended for the yarn with these, but it is all what you are comfortable with.


Now once you get to the end just chain one and do a few more sc rows.  For worsted weight I tend to do 4 rows, but for this example in dk I did 5 rows.


If it starts to pull in a little that is okay.  We are going to start gathering it and decreasing anyway.
This is where I start to use Laurie’s pattern (Free Big Girl Kitchen Towel).  We want to sc dec
(A sc dec is insert hook into both loops of first stitch being worked, yo, pull up a loop, insert hook into both loops of next stitch, yo, pull up a loop, yo, draw through all 3 loops on hook)
over the next few rows to get down to 6 stitches.  Now this all depends on how many stitches you have.  In this example I have 54 stitches. 
So first row I just do sc dec all the way across and I end up with 27 stitches.


Next I sc dec 7 times, 1 sc, sc dec 6 times to get to 14 stitches.


Then I did sc dec 2 twice, dec over 3 stitches twice, then sc dec twice to get down to 6 stitches.
(dec over 3 stitches is insert hook into both loops of first stitch being worked, yo, pull up a loop, insert hook into both loops of next stitch, yo, pull up a loop, insert hook into both loops of next stitch, yo, pull up a loop, yo, draw through all 4 loops on hook)


Once down to 6 stitches, chain one and sc across.


Continue making the 6 stitch rows


I did about 20 rows.
Next, once it is long enough you will do the row that will become your button hole. 
From Laurie’s pattern:
Note:  Before proceeding, you may wish to fit your hanging loop to the place where you'd like it to hang.  If worked as instructed it will fit the average drawer pull or oven door handle.  If you need to add length simply continue repeating Row 64 as necessary.
Row 82:  ch3 (counts as dc), trc in next st, dtrc in next 2 sts, trc in next st, dc in next st, turn (6 sts)
Note:  The space between the two dtrc is your buttonhole.

Next you want to chain one and sc in the first two sts, two sc in each of the next two sts, and then sc in the last two sts, do not bind off.


Next, you want to sc down the side and stop right where you started the decreases.


Fasten off, then start on the other side where the decreases started.


Fasten off and weave in ends.


Sew on a button of your choice.


Sam, I can't thank you enough for dropping in to do this. I LOVE this idea and am going to have to make a couple for a friend this week.

By the way, folks, you can find Samantha's blog HERE.

Happy Crocheting!

Sunday, January 8, 2012

Happy Healthy New Year (recipe)

Happy New Year everyone!

I must apologize for my tardiness. The blog schedule got a bit wonky and this was supposed to be the New Year's Day post (the whole healthy eating thing... blah blah blah). Anyhow, it's here now and that's all that really matters, so grab a saucepan and cozy up to the stove.

There are few things I like better on a snowy New England morning than a bowl of oatmeal and a mug of hot cocoa. That's what I call comfort food. But I'm not crazy about plain oatmeal and I'm not a fan of the instant stuff.

Regardless of how it's prepared, I try to have oatmeal at least one morning each week because I figure it offsets my love of eggs for breakfast, which I try to limit to one morning each week. Makes sense, right? So I experiment.

A couple of months ago, I threw this together and my first reaction was, "I need to write this one down!"

Auntie's Oatmeal for Two

1 cup milk
3/4 cup water
1 Tbsp dark brown sugar
1/8 tsp nutmeg
1/4 tsp cinnamon
dash of salt
1 cup rolled oats (quick cooking, not instant)
1 Tbsp maple syrup
1/4 cup raisins (optional)

Bring milk and water to a boil in a 1 quart saucepan
Lower heat and add brown sugar, nutmeg, cinnamon, and salt
Stir until sugar is dissolved
Add oats and cook over low heat for about 1 minute
Add maple syrup and raisins, stir
Remove from heat and let stand for a minute or two to thicken

Yield 2 servings

The Usual Notes:

To double or triple the recipe, no additional instructions are necessary.
If you only have light brown sugar, then use it. I just prefer the dark.
When it comes to cinnamon, less is more. I once accidentally added a bit too much and POW! That'll wake you up for sure.
Don't skip the salt. Trust me on this one. It's just a tiny amount, but it makes a huge difference in the flavor.
If you buy your raisins in the single-serve boxes for the kids, one box is the perfect size for this.
Don't go crazy looking for top quality maple syrup. That cheap imitation pancake syrup works just fine. In fact, given the choice between the two, I'd save to good stuff for waffles and pancakes.
Yes! You can reheat this if you find you have leftovers. Simply reheat in the microwave but stir in about a tablespoon of milk per serving first.

it will thicken if you let it rest for a minute before serving

Variations:

When I don't have raisins on hand, I like to slice banana over the top instead.
For apple cinnamon oatmeal, omit the maple syrup and cut down or omit the raisins. Replace them with about 1/2 cup of applesauce. (I love to do this in the fall when we have tons of homemade applesauce, but the stuff in the jar works just as well.)

By the way, I won't tolerate whining that you don't have time to make this in the morning. It takes less time than brewing a pot of coffee. Set your ingredients (except for your milk) on the counter the night before so you're ready to go.

Rise and shine!