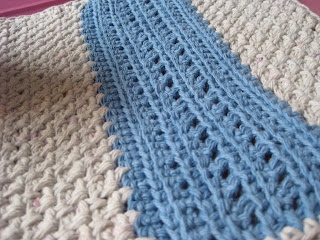
Seriously! That's how this design came to be. I needed one more pattern to round out the "Table and Tub" group from my Blog Collection and I toyed with several ideas: table runners, napkin rings, oven mitts . . . But nothing clicked for me. Then, one day, I found myself using a store-bought kitchen towel as a placemat. I was eating lunch at my desk and didn't want to get food on my laptop, so I draped the towel over it. After the lightbulb turned on over my head, I set to work and threw together a few notes and a quick sketch.
It's taken me about two years to get around to actually working and writing the pattern, but here it is. I finally knuckled down to make this because I realized we only had two hand towels for our bathroom. Of course, I love a pattern with some versatility, so I've included instructions for adding that cute little hanging loop you see on the corner. That's where the hand towel thing figures in. This little guy is just the right size to use for a placemat or as a hand towel. Besides, I like the way it looks in the bathroom hanging from that little loop.
Have fun with this one!
Placemat Pattern
by Laurie Laliberte Designs
A simple pattern to protect or accent your table top. Make a full set for yourself or to give as a hostess gift.
Finished Measurements:
approximately 12" x 16"
Supplies Needed:
size I-9 (5.5mm) crochet hook
about 2 oz. worsted weight yarn in Color A
about 1 oz. worsted weight yarn in Color B
smaller hook or yarn needle for weaving in ends
Samples were stitched using
100% cotton Sugar 'n Cream and/or Peaches & Creme worsted weight yarn.
All instructions use American Terminology.
Special Instructions:
BLO -- back loop only
FLO -- front loop only
Instructions:
Notes: Each row is 39 sts across.
If you are working in two colors, change colors at
the beginning of the Rows with the *.
ch 40
Row 1: sc in 2nd ch from hook, [ch1, sk next ch, sc in next ch] across, turn
Row 2: ch1 (does not count as 1st st here or in following rows), sc in 1st sc, sc in next ch1 sp, [ch1, sk next sc, sc in next ch1 sp]
Row 3: ch1, sc in 1st sc, [ch1, sk next sc, sc in next
ch1 sp] across, ending w/sc in last sc, turn
Rows 4-10: repeat Rows 2-3 ending w/a Row 2
*Row 11: ch1, sc in each sc and ch1 sp across, turn
Row 12: ch1, sc in BLO of each st across, turn
Row 13: ch1, sc in FLO of each st across, turn
Row 14: ch1, sc in BLO of 1st st [dc in BLO of next st, sc
in BLO of next st] across, turn
Row 15: ch1, sc in FLO of 1st st [sc in FLO of next st, dc
in FLO of next st] across ending w/sc in each of last 2 sts, turn
Row 16: rep Row 14
Row 17: rep Row 15
Row 18: rep Row 14
Row 19: ch1, sc in FLO of each st across, turn
Row 20: ch1, sc in BLO of each st across, turn
Row 21: rep Row 19
*Row 22: ch1, sc in 1st st, [ch1, sk next st, sc in next st]
across, turn
Row 23: ch1, sc in 1st sc, [sc in next ch1 sp, ch1, sk next
sc] across ending w/sc in each of last 2 sts, turn
Row 24: ch1, sc in 1st sc, [ch1, sk next sc, sc in next ch1
sp] across ending w/sc in last sc, turn
Rows 25-57: rep Rows 23-24 ending w/a Row 23
Finishing Round:
sc evenly around working 3sc in each corner
Optional Hanging
Loop:
ch 10, sl st in 1st sc of Finishing Round, sl st in each ch back to beg, sl st to close loop at base
finish off, weave in ends
Designer's
Note:
Any pattern I design is my intellectual property.
Please do not duplicate any of my patterns for any reason especially
to sell. Instead, please link to my blog or to the pattern page in one of my shops
when referencing one of my patterns.
You are more than welcome to
offer finished items made from my patterns for sale. In fact, I encourage it. However,
I'd really appreciate it if you gave me credit for the design. Please reference
my blog or the pattern page.
Happy Crocheting!


